
latest
habitat tv

Say goodbye to the morning scramble for keys, coats and sunglasses and hello to this… see this and more videos
blog

Brick Bay unveils its poetic new folly for 2026
The winner of the 2026 Brick Bay Folly competition has been unveiled. Within the Wings… more
Blog: Preserving your memories
10 Aug 2017
Enjoy your favourite photos every day with these three crafty framing projects, from Good magazine. Styling by Sarah Heeringa.
Hanging photo wall
You need:
- Up to 20 square photographs (all 10cm x 10cm)
- White card, medium thickness, cut into squares (8cm x 8cm)
- White string
- Spray adhesive or glue stick
- Scissors and ruler
- A branch or length of bamboo (paint with Resene Black White if you wish)
- 1 metre of nylon line
- Small stones (optional)
- Blu-Tack®
Step 1: Prepare and print images
Adjust the photographs before printing to ensure they are of a similar tonal range. Open each image using a photo editing tool and using the saturation function, de-saturate each one to strip out any intense shades.
Alternatively, apply the same photo filter to each image or print them in sepia or black and white. Some stores can print photos in a square format with white borders, so check for this option.
Alternatively, trim regular rectangular prints down to size and mount them on slightly larger white card for a similar effect.
Step 2: Arrange in order
Lay photos out on a large flat surface in vertical columns to form a grid, allowing a 2cm space between each photo vertically. Arrange images into a pleasing composition, checking for a balance of subjects, shapes and colours. Turn each photo over, maintaining the grid arrangement.
Step 3: Attach strings
Cut strings the length of each vertical column plus an extra 50cm. Lay the strings along the middle of each vertical column, with 30cm of the extra string at the top and 20cm at the bottom.
One at a time, lay each white card on clean scrap paper and lightly coat one side with glue.
Starting at the top left corner of your grid, place each card, sticky side down, onto the back of each photograph, sandwiching the string in between.
Use a ruler to ensure the photos are evenly spaced on the string and line up with the corresponding photo on either side. Leave to dry.
Step 4: Assembling your photo wall
Attach the nylon line to the stick ends and hang it horizontally on the wall. Attach each photo string to the stick, ensuring the images line up by first attaching each top photo to the wall using Blu-Tack® and then tying the string to the stick above.
If you like, tie a small stone to the bottom of each string.
Upcycling an old frame
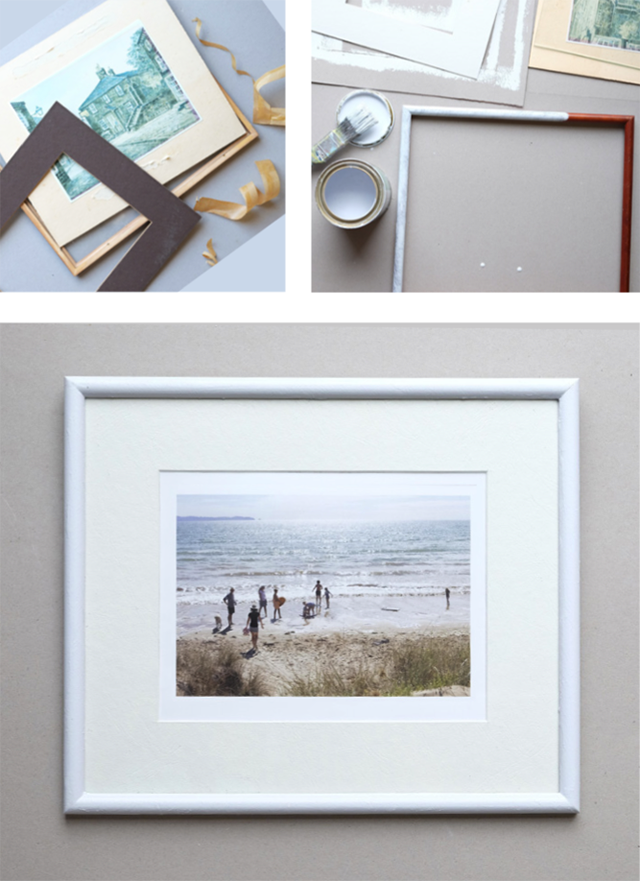
You need:
- A photograph
- A second-hand picture frame that includes an outer frame, firm backing board and a mat or mounting board cut to fit
- Masking tape
- Wide brown picture framing tape
- Glazier points or tiny nails
- Small pliers and a hammer
- Nylon line
- D-ring or small screws
- Dropcloth
- Small paintbrush
- Resene Enamacryl waterborne enamel in a colour of your choice. Sarah used Resene Breathless for the frame and Resene Black White for the mat.
Step 1: Disassemble frame
Lay the frame front side down and remove the back tape and any pins. Notice how the frame has been put together. Remove any brown framing paper used to cover up the inner workings. Often the stiff backing board is held in place with staples, tiny nails or glazier points. Use pliers to gently remove or bend these out of the way.
Step 2: Clean glass
Carefully take out the glass, wash it using warm soapy water and lay it on a tea towel to dry. Polish dry.
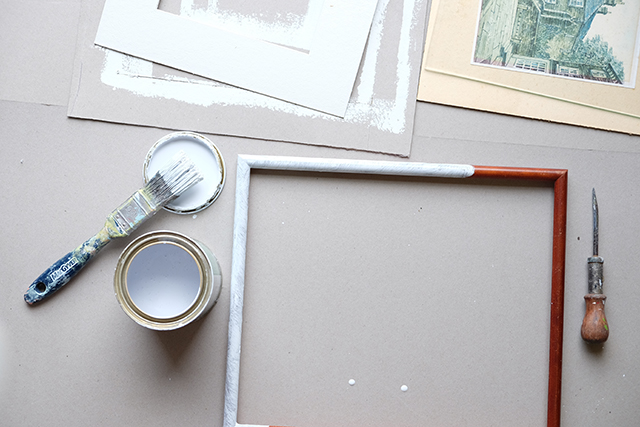
Step 3: Paint the frame and mount
Wipe the frame free of dust. Lay the frame on the dropcloth and coat with paint, making sure you cover all edges that will be visible when hung. Many old frames have mats that are good enough to reuse. Give it a fresh look with a coat of matt white paint. Allow frame and mat to fully dry.
Step 4: Reassemble the frame
Lay the frame face down on a clean, flat surface. Carefully place the glass back into the frame and check the surface facing you is lint-free. Place the photo behind the mat and secure using a strip of masking tape along the top.
Lay the mount face down on the glass. Before taping everything up, turn the frame over and check the photo is positioned correctly and that no lint is trapped behind the glass.
Return any glazier points or tiny nails back into the frame to hold the backing board and glass in place, using new ones if necessary. Tape all around the edge using wide brown picture tape.
On the back of the frame, screw in two small screws or D-ring hangers on either side, an equal distance from the top. Firmly tie the nylon line between rings. Clean any stray fingerprints off the front glass and your picture is ready to hang.
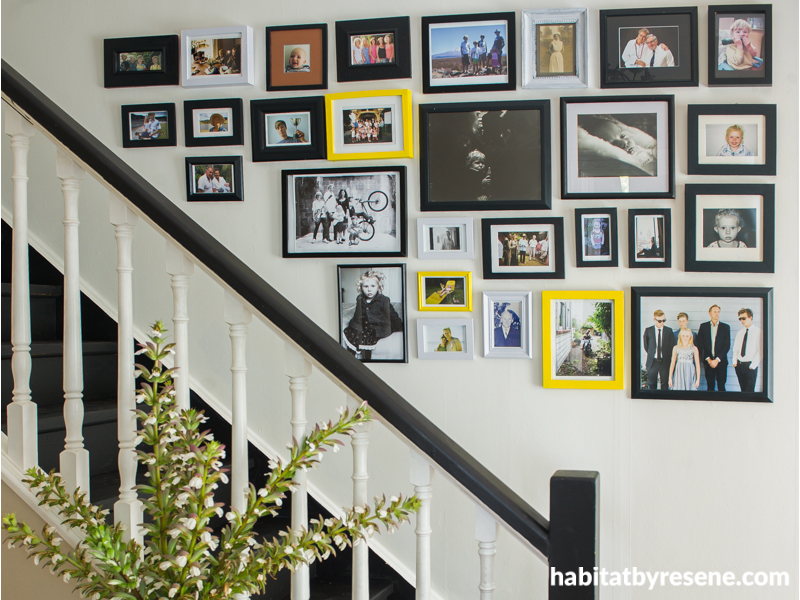
Composing a photo gallery
You need:
- Coordinated photo frames
- Dark thread
- Blu-Tack®
- Spirit level
- Roll of newsprint, brown paper or newspaper
- Hammer and nails
- Picture hanging hooks or adhesive hanging strips
- Step-ladder or stool
Step 1: Pick your photos
Summer is great for taking photos, but how many of our images from this season or years past lie dormant on our computers? Framing and hanging photos releases them into your home to be enjoyed by all. Gallery walls are ideal for combining different images together, so celebrate your heritage by adding in some older family photos or mix in a few shots of quirky moments to remember.
Step 2: Coordinate the frames
Use all white or all black frames, or for a less formal effect, mix black and white frames together with frames in an accent colour. See project #2 for painting old frames in selected shades.
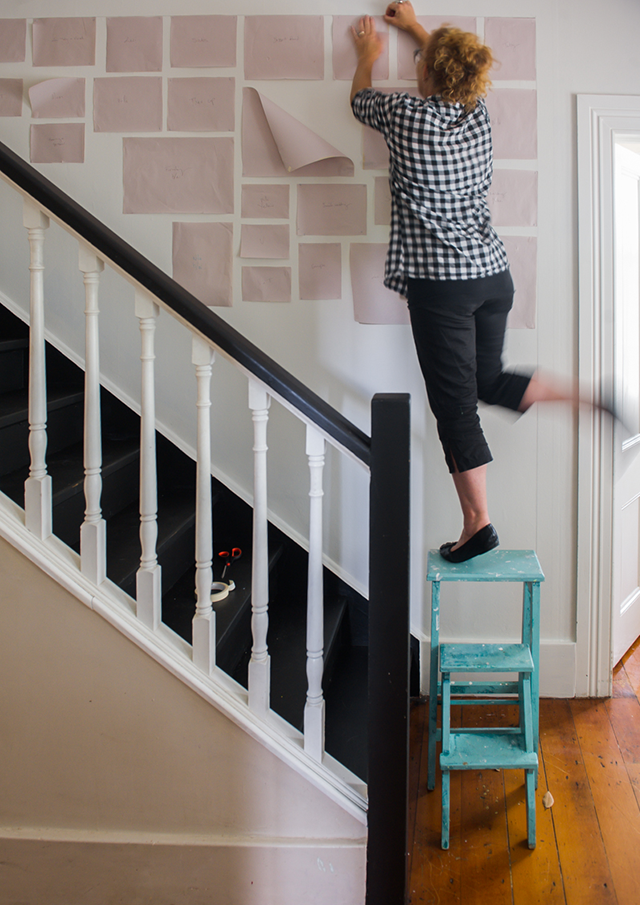
Step 3: Create paper templates
As you cut a template of each frame, write on each one the frame colour and a brief description to help you visualise each photo and its orientation as you hang it. Sort the templates by size. Cutting templates takes time but makes composing and hanging the gallery far easier.
Step 4: Compose your wall
Photo galleries can be arranged as a simple grid or symmetrically around a large central image. In the stairwell (right), Sarah used a triangular shape to complement the rising stairs.
Before starting, look carefully at your wall to consider the most pleasing shape. Your gallery needs either some vertical or horizontal lines to look ordered, so decide where you want these and mark them out using the thread and spirit level. For example, Sarah started by marking out the top and side of the triangle.
Decide on the placement of any larger frames and rearrange the smaller shapes around these until the configuration looks balanced. Cluster similar sized frames together in rows or columns. Ensure any accent frames are evenly spread.
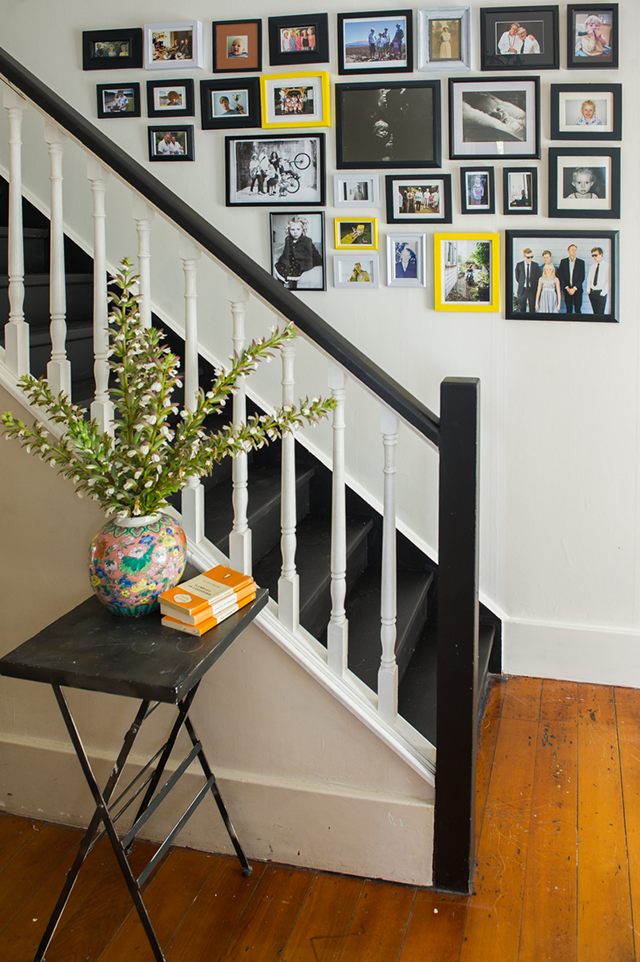
Frames painted in Resene Blackjack, Resene Breathless and Resene Wild Thing
Step 5: Hang your pictures
When you are happy with the arrangement, use each template to help you work out exactly where to attach each picture hook on the wall. Once each photo is hung in place, pull away the paper from behind the frame.
Photography by Amanda Reelick. For more tips, tricks and clever ideas with Resene paint, head to www.good.net.nz.
Published: 10 Aug 2017

