
latest
habitat tv

Say goodbye to the morning scramble for keys, coats and sunglasses and hello to this… see this and more videos
blog

Re-living the 1980s through art
Clint C is an artist whose work instantly sparks recognition and joy. Based in Hamilton,… more

Making of a Resene DIY video
18 Jul 2018
Ever wonder what goes into making our crafty DIY videos? Stylist Leigh Stockton, who creates the projects using Resene paint and clever DIY ideas, gives us a look behind the scenes.
Colour, colour, colour… it’s something I can talk about for hours. The other thing that makes me tick? Thinking up nifty do-it-yourself projects and bringing them to life in front of the camera. And so I’m beyond lucky that part of my job is to create these colourful habitat by Resene videos, which blends my love of colour and DIY.
Each video is around 30 seconds long, but, unsurprisingly the production of each one takes a lot more time. Here’s a quick look at what’s involved:
It’s all about the prep
Before we even think about filming, there’s a lot to be organised.
I start by writing down the project idea and instructions from start to finish. Then I sketch up the full look, including the decor that will appear in the finished photograph. Once I’m happy that it’s a good achievable project to share, I move on to my favourite part – choosing the colour palette.
I prefer to go into my local Resene ColorShop to discuss colour choices – the staff know me well and we have fun thinking about colour combos together. If I’m running tight on time, I simply head to the colour library on the Resene website and look at swatches to figure out the colours.
Alternatively, I might find something through my research that will inspire the colour palette. The colours for this DIY key holder were inspired by a photograph of a retro bicycle, which was run through the Resene Colour Palette Generator.
Once the production crew is briefed, studio is booked, and I’ve collected all the bits and bobs to create the project (Resene testpots, brushes, materials, etc.), it’s action time!
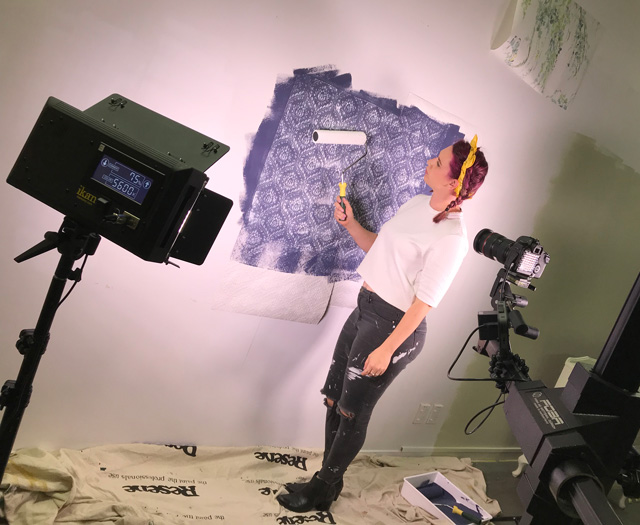
Lights, camera, action
Each video roughly takes two hours to film. Our camera man Ben Whorwood sets up the lights and camera, while I organise the materials into the order that they will be filmed. My script has been tightly written and looked over by Ben to make sure we don’t miss any important shots.
We always have a Resene dropcloth, paint trays, testpot brushes and Resene testpots on set, ready to go. I also keep a bucket filled with water to drop my brushes into between shots, as I don’t have time to run out and clean them.
Things do go wrong sometimes, I won’t lie. There have been paint spillages, and I always end up with paint in my hair somehow. I’ve learnt not to wear any expensive clothing on set – paint splattered jeans are now my uniform. But it’s all part of the fun!
From camera to screen
After we’ve wrapped filming, Ben will head to the edit suite. Here he puts together the shots as well as text and animation. Ben and I have created almost 20 videos together, and we try make each video better than the last – the aim is to make them fun and inspiring, and quick and easy to follow.
While he does that, I get photographs taken of the project at its finished stage with a professional photographer, Bryce Carleton. They’re lightly styled to give context to the finished piece.
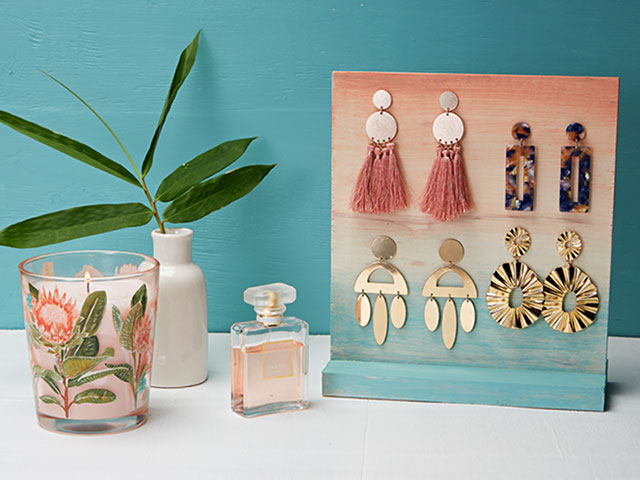
DIY statement earring stand. See the video here.
Once Ben is finished editing and approval is given, the video is uploaded to habitat by Resene and our YouTube channel.
It’s always exciting to see my project on screen. It’s even more exciting to see how popular they are.
Our latest videos are all about getting creative with wallpaper from the Resene Wallpaper Collection. From dressing up your drawers to painting an antique effect, you can see them all here (including easy step-by-step instructions).
Published: 18 Jul 2018

