
latest
habitat tv

Say goodbye to the morning scramble for keys, coats and sunglasses and hello to this… see this and more videos
blog

Reader roundup: See what our readers have been up to!
Refurbished vintage furniture, charming exteriors and magnet walls for kids. These projects are sure to… more
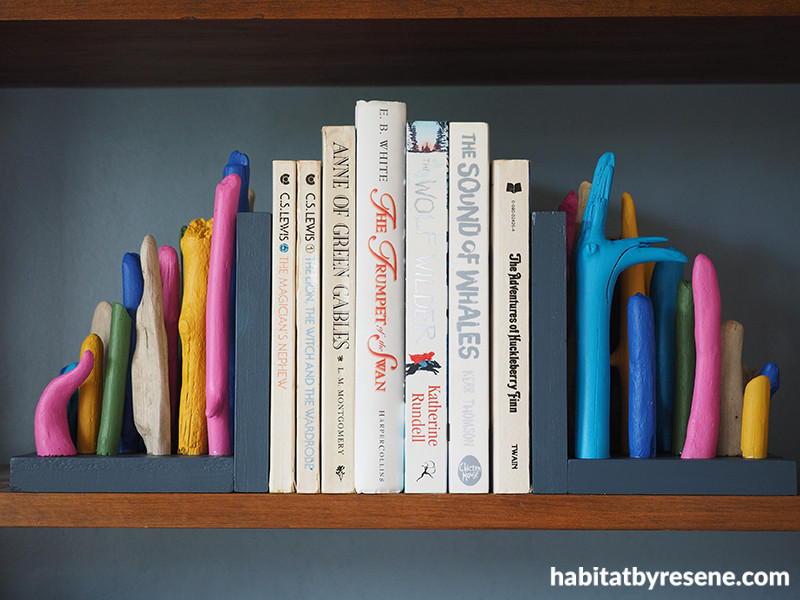
Add some pizzazz to your shelf with these DIY driftwood bookends
09 Sep 2020
Crafted from a handful of easy to source components, these lively bookends are gorgeous to look at and easy to make too. You can use any Resene testpots you fancy to complement or contrast with your surrounding decor.
You will need:
- 270mm of 115mm x 18mm untreated pine
- Saw
- Sandpaper
- Clamps
- Wood glue
- Electric drill, drill bit and countersink
- 4 screws
- Resene Quick Dry waterborne primer undercoat
- Selection of driftwood
- Resene testpot brush or small craft brushes
- Resene testpots in colours of your choice – Fleur used Resene Coast, Resene Bowie, Resene Torea Bay, Resene Cleopatra, Resene Smitten and Resene Green House

Step 1 Cut your pine into two lengths – 150mm and 120mm. Sand any rough edges smooth then wipe away dust with a clean, dry cloth

Step 2 Use two clamps to hold the wood together, with the shorter length on the bottom and the longer length standing up. Pre-drill two holes for the screws. Make sure you use a countersink so that the screws sit flush with the wood.

Step 3 Prime the wood with a coat of Resene Quick Dry waterborne primer undercoat.

Step 4 Paint the wood with Resene Coast in two coats, waiting for the first coat to dry before applying the second coat.

Step 5 Use a saw to cut the driftwood into short lengths that range from approximately 55mm to 170mm. Make sure that the cut ends are flat so that the wood will stand upright on its cut end.

Step 6 Divide the driftwood into six groups. Paint the remaining pieces using Resene testpots in your choice of colours – Fleur used Resene Bowie, Resene Torea Bay, Resene Cleopatra, Resene Smitten and Resene Green House. You may also choose to leave some pieces of driftwood unpainted as Fleur did.

Step 7 Use wood glue to adhere the flat ends of your driftwood to the base of the bookends. Work from longest to shortest as you get towards the end of the base.
 Just like that you’ve handmade a pair of stunning bookends that will have your bookcase ready for its Instagram debut! Fleur used Resene Coast, Resene Bowie, Resene Torea Bay, Resene Cleopatra, Resene Smitten and Resene Green House on the bookends. Wall in Resene Lynchpin.
project and images Fleur Thorpe
Published: 09 Sep 2020

