
latest
habitat tv

Say goodbye to the morning scramble for keys, coats and sunglasses and hello to this… see this and more videos
blog

Brick Bay unveils its poetic new folly for 2026
The winner of the 2026 Brick Bay Folly competition has been unveiled. Within the Wings… more
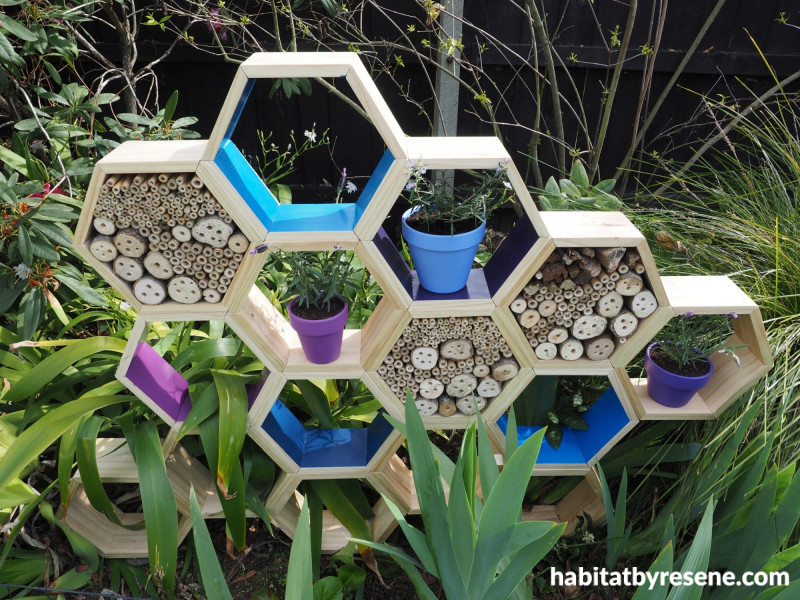
DIY Bee Aware garden sculpture
22 Sep 2022
September is Bee Aware month – so it’s time to step outside and smell the roses and take note of the 28 species of native bees and 13 species of introduced bees that make up our eco system. Honey bees, bumblebees and other pollinators play an important role in our lives pollinating flowers and plants to create the food we love to eat. This DIY garden sculpture provides a nesting ground for bumble bees, other solitary bees and beneficial insets as well as a pot platform for plants that honey bees will love. Bees are attracted to the colours blue and purple and like plants with big open flowers. Try planting borage, oregano, thyme, rosemary, asters or dwarf lavender.
You will need
- 15m of treated dressed pine 120mm wide
- Mitre saw
- Measuring tape
- Sandpaper
- Small microfibre roller
- Resene Quick Dry
- Paint brush
- Paint
- Wood glue
- Masking tape
- Cloth
- Brad nail gun or electric drill and screws
- Marine plywood
- Lengths of bamboo, small logs, bark
- 3 small terracotta pots
- 1 rosemary and 2 lavender plants
- Resene testpots in your choice of colours; Fleur used Resene Captain Cook, Resene Wet N Wild, Resene Eye Candy, Resene Plum, Resene Lucky Point, Resene Eminence, Resene Chetwode Blue and Resene Blue Diamond

Step 1: Set your mitre saw to a cutting angle of 30 degrees and cut your wood into 90 equal lengths so that the long side of the finished board is 16cm long. Use sandpaper to remove any rough edges.

Step 2: Take 30 of the boards (enough for five hexagons) and use a small microfibre roller to prime the inside surface (the short length) with Resene Quick Dry. You might find it easier to line up all the boards up and go over them with the roller en masse rather than individually.

Step 3: Once the Resene Quick Dry is dry, use a fine grit sandpaper to give the painted surface a light sand. Next, use a paint brush to paint each of the five different hexagons a different colour. Fleur used Resene Captain Cook, Resene Wet N Wild, Resene Eye Candy, Resene Plum and Resene Lucky Point. Paint on two coats, allowing the first coat to dry before applying the second coat.

Step 4: Once the paint is dry, use wood glue to glue all the hexagons together, including the ten unpainted hexagons. Fleur found it helpful to use some masking tape to hold the edges together while the glue dried. Once the glue is dry, remove the tape and use a brad nail gun or an electric drill and screws to secure the corners together.

Step 5: Now you can start putting the sculpture together. Use an electric drill and screws to attach all the hexagons to each other. Where possible, try to place the screws on the underside of each hexagon.

Step 6: Cut a piece of marine ply to fit the back of three of the hexagons and nail or screw this into place.

Step 7: For the three plant pots, use Resene Aquapel & Terracotta Sealer to seal the pots and once dry, apply two coats of Resene Eminence, Resene Chetwode Blue and Resene Blue Diamond. Fill with bee-friendly plants such as lavender and rosemary.

Step 8: Cut lengths of bamboo, small logs/branches and bark wood into 12cm lengths. Drill holes in the ends of the logs to create extra homes for bees. You may also need to drill out the middle of small bamboo. Drill a variety of hole sizes. If it’s a bug hotel, vary the hole sizes between 2mm and 10mm. Vary the holes between 8mm and 10mm.
Position your sculpture in a sunny part of the garden where it won’t get hit by the worst of the weather. You may need to bang in a couple of wooden stakes into the ground next to the sculpture and drill these to the sculpture to make sure it stays up in rough weather.
Fill three of the hexagons with the cut bamboo and wood, and place the plants in three of the remaining hexagons.
Published: 22 Sep 2022

