
latest
habitat tv

Say goodbye to the morning scramble for keys, coats and sunglasses and hello to this… see this and more videos
blog

Re-living the 1980s through art
Clint C is an artist whose work instantly sparks recognition and joy. Based in Hamilton,… more
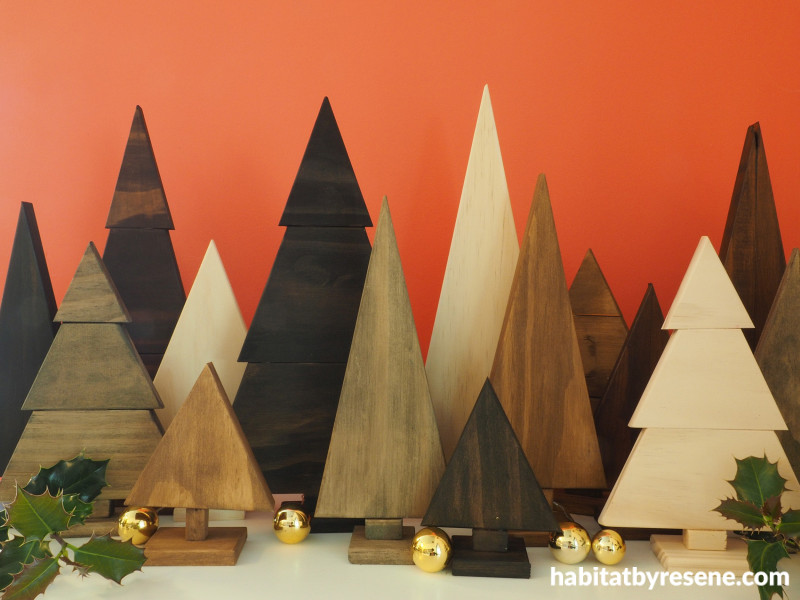
Create a Christmas tree forest for a merry mantelpiece
24 Nov 2021
Why settle for just one Christmas tree when you can have a whole forest? These Christmas trees made from timber off-cuts are stained in five different shades of Resene Colorwood to create a decorative display for your mantelpiece or table.
You will need
- Scrap wood (Fleur used untreated pine)
- Mitre saw
- Sandpaper
- Resene Colorwood stains in your choice of colours, Fleur used Resene Colorwood Ebony, Resene Colorwood Touchwood, Resene Colorwood Matai, Resene Colorwood Teak, Resene Colorwood Rock Salt
- Cloth/rag
- Rubber/silicon gloves
- Wood glue

Step 1: Start by cutting your wood into tall triangles and tree shapes. For this project Fleur used some scrap untreated pine wood but any easy-to-cut wood will work. Sand down any rough edges with medium-grit sandpaper. Use wood glue to glue together any trees that are made of multiple pieces. Take care not to get any glue on the front face as it will stop the wood stain penetrating into the timber.

Step 2: Wear silicon rubber gloves and use a soft, lint-free cloth to rub the stain on to the trees. Fleur used Resene Colorwood Ebony, Resene Colorwood Touchwood, Resene Colorwood Matai, Resene Colorwood Teak and Resene Colorwood Rock Salt. Fleur did two coats of Resene Colorwood Teak and Resene Colorwood Rock Salt, and one coat of Resene Colorwood Matai, Resene Colorwood Touchwood and Resene Colorwood Ebony.

Step 3: Cut out some small bases and ‘trunks’ from some more scrap wood. Stain these the same colours as the trees.

Step 4: Use wood glue to attach the base and trunks to the trees. Allow the glue to dry for a couple of hours. If you want a slightly glossier finish, you could rub on some Resene Danska Teak Oil or coat with Resene Aquaclear waterborne urethane.

Create a colourful forest of Christmas trees by staining your timber in a range of wood stain colours. Fleur’s trees are painted in Resene Colorwood Ebony, Resene Colorwood Touchwood, Resene Colorwood Teak, Resene Colorwood Rock Salt and Resene Colorwood Matai and the wall colour is Resene Rapture.
project and image Fleur Thorpe
Published: 24 Nov 2021

