
latest
habitat tv

Say goodbye to the morning scramble for keys, coats and sunglasses and hello to this… see this and more videos
blog

Reader roundup: See what our readers have been up to!
Refurbished vintage furniture, charming exteriors and magnet walls for kids. These projects are sure to… more
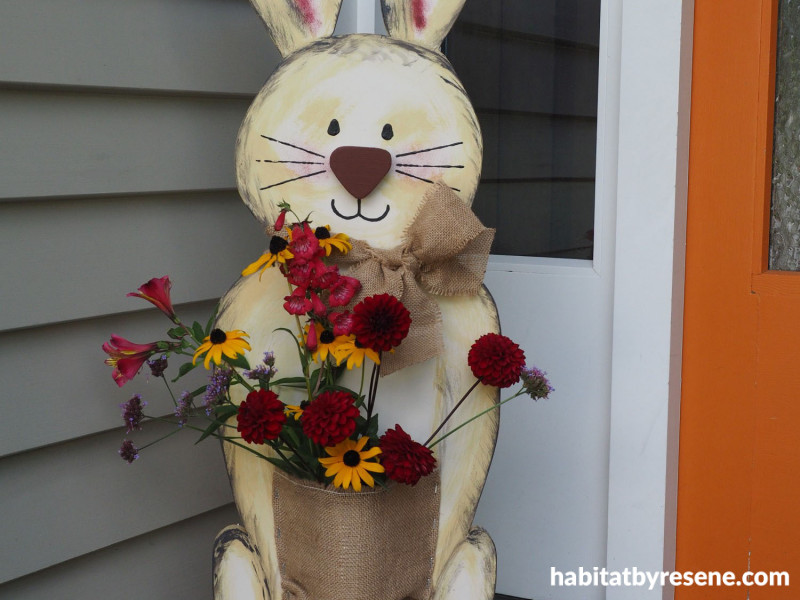
Create your own front door welcome bunny
31 Mar 2021
Create a friendly bunny to welcome your guests at the door. This cute decoration is sure to brighten up your entrance way and is the perfect place to hide chocolate for your easter egg hunt.
You will need:
- Untreated pine wood in the following sizes:
- 90cm length of 280mm x 18mm
- 60cm length of 24mm x 24mm
- 60cm length of 60mm x 10mm
- Pencil
- Jig saw
- Medium grit sandpaper
- Resene Quick Dry primer undercoat
- Resene testpots in your choice of colours; Fleur used Resene Quarter Canterbury Clay, Resene Putty, Resene Ebony Clay, Resene Black, Resene Blumine and Resene Burnt Crimson
- Paint brush and a small artist’s paint brush
- Small piece of foam
- Wood glue
- Tin can
- Blu Tack
- Burlap sack/hessian fabric
- Scissors
- Staple gun

Step 1: Start by using a pencil to sketch out the bunny shape on to your piece of board.

Step 2: Use a jig saw to cut out the bunny and sand the edges smooth with a piece of medium grit sandpaper.

Step 3: Make two square notches that are 24mm x 24mm at the bottom of the bunny. This is where the legs for the stand will go.

Step 4: Use Resene Quick Dry primer undercoat to prime the bunny.

Step 5: Next, paint the entire bunny with your chosen colour. Fleur used Resene Quarter Canterbury Clay. With a dry brush, paint on a darker colour, Fleur used Resene Putty, and follow the outline of the shape to give the bunny contours.

Step 6: Repeat step 5 again, but this time use an even darker colour, Fleur used Resene Ebony Clay, to outline the body shape and to give definition to shadowy areas.

Step 7: Paint the eyes using a dark colour. Fleur used Resene Black for the eyes. Use a dry piece of foam to dab on a medium shade of paint, Fleur used Resene Burnt Crimson, for the cheeks and the inner ears.

Step 8: Make the nose by cutting out a piece of left over wood into a soft triangular shape. Sand any rough edges smooth and paint it with your chosen colour. Fleur used Resene Burnt Crimson. Once dry, use wood glue to glue it to the face. Finish the face by painting on a mouth and whiskers.

Step 9: For the tummy pouch, Blu Tack a tin can to the front of the bunny to secure it.

Step 10: Stretch a piece of hessian or burlap over the tin and use a staple gun to attach the material to the wood.

Step 11: To make the legs for the stand, cut your 24mm x 24mm wood into two 30cm lengths. Fleur rounded the ends to give it a more finished look. Paint the legs and use a dry brush to lightly add a different colour. Fleur used Resene Putty for the legs and Resene Ebony Clay for the dry brushing.

Step 12: Screw the legs into the notches that you cut earlier.

Step 13: Measure the height of the piece of wood for the sign and print out the word ‘WELCOME’ to a size that will fit the wood.

Step 14: Cut your piece of wood to size and then tape your print-out to the wood. Use a ballpoint pen to trace around the letters, pressing hard so that it leaves an imprint on the wood.

Step 15: Use a small artist’s brush to fill in the letters, Fleur used Resene Blumine, and glue the sign to the top of the legs. Fleur used a piece of spare wood at the back of the sign to hold it in place.

Step 16: Finish the project off with a bow of hessian or burlap around the bunny’s neck. Fill the tin can with some water and get the kids to choose some of their favourite flowers from the garden.
project and images Fleur Thorpe
Published: 31 Mar 2021

