
latest
habitat tv

Say goodbye to the morning scramble for keys, coats and sunglasses and hello to this… see this and more videos
blog

Re-living the 1980s through art
Clint C is an artist whose work instantly sparks recognition and joy. Based in Hamilton,… more
Create your own retro striped sideboard
15 Jul 2020
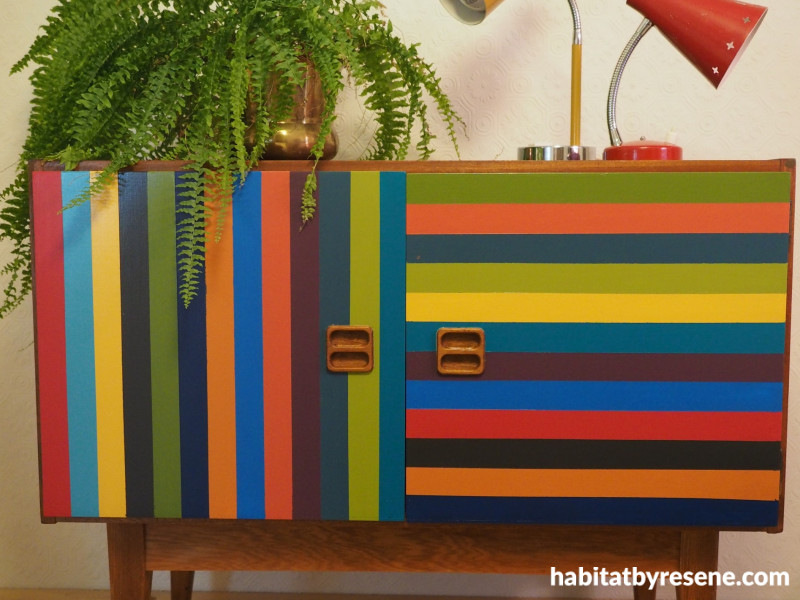
Bring some bold hues into your home with this retro-inspired DIY sideboard project.
You will need:
- Medium and fine grit sandpaper
- High-quality painter’s masking tape
- Resene Quick Dry
- Testpot paintbrush
- Pencil
- Ruler/tape measure
- Resene testpots in your choice of colours – Fleur used Resene Shiraz, Resene Bi Hoki, Resene Untamed, Resene Fast Forward, Resene Captain Cook, Resene Sea Crest, Resene Cleopatra, Resene Red Herring, Resene Porter, Resene RSVP, Resene Regatta, Resene Grass Hopper and Resene Yowza
Step 1 Start by lightly sanding down your piece of furniture with medium grit sandpaper. This removes any rough bits and provides a key for the paint to adhere to. Wipe down all surfaces with a clean, dry cloth to remove any dust.
Top tip: If your sideboard has a glossy smooth surface and you’d prefer not to do any sanding, you can clean then seal with Resene Waterborne Smooth Surface Sealer. This will provide the topcoats with something to grip onto.

Step 2 Using high-quality painter’s masking tape, mask off any areas that you don’t want to get paint on.
Step 3 With a small foam roller, use Resene Quick Dry to prime the areas you want to paint. Once this is dry, lightly sand it using your fine grit sandpaper. Then, use a clean, dry cloth to wipe away any dust.

Step 4 Measure the length and height of both doors and work out how thick you want your stripes to be. Fleur’s stripes are 3cm thick, and there are 13 vertical stripes on the left hand door and 12 horizontal stripes on the right hand door. Carefully measure out your stripes and make light marks with a pencil first so that your masking will be nice and straight.

Step 5 Use high-quality painter’s masking tape to make your stripes, pressing the edges down firmly. The ‘washi-style’ masking tapes available from your local Resene ColorShop will ensure you get clean, smooth lines when removed.

Step 5 Apply the first coat of paint on each stripe and allow it to dry before applying your second coat. Remove the tape as soon as you have finished each stripe and preferably while the paint is still wet. Allow your piece to dry fully, ideally leaving it overnight in a spot that’s not too cold so that the paint can cure.

Step 6 Apply new masking tape over the painted stripes so that you can fill in the remaining stripes. Remember to press down on the edges of the tape firmly to prevent any bleed through of paint.
Step 7 Apply two coats of your chosen Resene testpot paint colours on the remaining stripes, allowing the first coat to dry before applying the second. To speed up the drying process, use a hair dryer on a low heat setting. Try to remove the tape as soon as you can after the second coat has been applied.

The best part about this project is that, by choosing whatever Resene paint colours suit your interior style, you can get a completely different look. Fleur used (from left to right) Resene Shiraz, Resene Sea Crest, Resene Cleopatra, Resene Porter, Resene Untamed, Resene Regatta, Resene Bi Hoki, Resene Captain Cook, Resene Red Herring, Resene RSVP, Resene Fast Forward, Resene Grass Hopper, Resene Yowza. Back wall painted in Resene Cararra.
images and project by Fleur Thorpe
Published: 15 Jul 2020

