
latest
habitat tv

Say goodbye to the morning scramble for keys, coats and sunglasses and hello to this… see this and more videos
blog

Re-living the 1980s through art
Clint C is an artist whose work instantly sparks recognition and joy. Based in Hamilton,… more
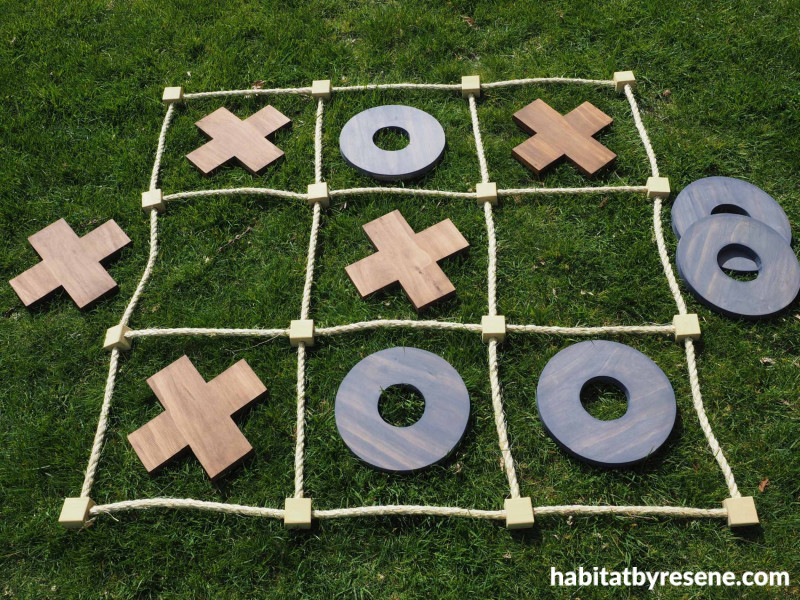
DIY: This wooden noughts and crosses set will be a hit during the holidays
08 Dec 2020
This outdoor noughts and crosses board will be a great addition for the backyard or family bach. While we’ve used Resene Woodsman wood stain on this project, it could easily be painted in bright colours for the kids or colours to suit your home’s colour palette.
Resene wood stains used in this project:
Resene Woodsman Skywater, Resene Woodsman Bark, Resene Woodsman Uluru
You will need
- 40m of H3 treated pine wood 23cm x 1.8cm
- 1m of H3 treated pine wood 4cm x 3.2cm
- 8m of sisal rope
- Pencil
- Ruler
- Compass
- Electric drill
- Jig saw
- Resene Woodsman stains (Fleur used Resene Woodsman Skywater, Resene Woodsman Bark, Resene Woodsman Uluru)
- Sandpaper
- Rubber gloves
- Soft cotton cloth/rag
- Cotton thread
- Measuring tape
- Wood glue
- Sharp craft knife

Step 1 Start by cutting the widest wood (23cm x 1.8cm) into 10 lengths of 23cm to make squares of wood. Place them into two piles, 5 in each pile.
Step 2 To make the crosses, use a ruler and pencil to measure and mark the mid-line on each of the four sides. From this mid-line, measure 4cm each way so that each arm of the cross is 8cm wide. Use a ruler to draw in the shape of the cross.

Step 3 To make the circles, use a ruler to draw diagonal lines from each opposite corner. Where they intersect is the centre. Use a compass to draw two circles – one at the outer edge and one smaller, about 8cm diameter in the middle.
Step 4 Use an electric drill to drill a pilot hole in the middle of the circle, and then a jig saw to cut out the smaller circle. Continue to use the jig saw to cut out the outer circle, and to cut out the shape of the crosses.

Step 5 With a soft cotton cloth, stain the crosses with Resene Woodsman Bark and use a different cloth to stain the circles with Resene Woodsman Skywater. Fleur did one coat, but two coats will give a more intense colour.

Step 6 To make the rope grid, cut the 4cm x 3.2cm wood into short lengths of 4cm. With an electric drill, use a drill bit the same diameter as the sisal rope and drill holes into the small blocks.
Four of the blocks will be on the corners and will need two holes adjacent to each other.
Eight blocks will need 3 holes – one that goes all the way through from one side to the other (making 2 holes) and a third hole drilled from another side. These eight blocks are the blocks on the four sides of the grid.
Finally, 4 blocks need 4 holes – these are the blocks that form the middle square of the grid.

Step 7 Sand any rough bits until smooth. Fleur also sanded the edges so they became rounded. Stain the blocks with Resene Woodsman Uluru.
Step 8 Cut four 1m lengths of sisal rope. For the top and bottom lengths of rope, thread on two side blocks (the ones with 3 holes), but don’t glue them in place yet. At either end of the rope, put on a corner block (the blocks with two holes). Glue these into place by squirting some wood glue into the hole and pushing the end of the rope into the hole.

Step 9 For the two middle lengths of rope, you need to thread on two blocks with four holes in them, and at the ends you need the side blocks with three holes in them. Fleur wound a cotton thread around the end of the rope to stop the rope from fraying and to make it easier to push the rope into the hole in the block.
Step 10 Lay out the four lengths of rope and use a measuring tape to position the middle blocks into equal distances apart (about 33.5cm apart). Glue these into place by squirting some glue into the vacant hole.
Cut the remaining length of rope into 12 lengths of 33.5cm and use these to form the rest of the grid.

Resene wood stains used in this project: Resene Woodsman Skywater, Resene Woodsman Bark, Resene Woodsman Uluru.
project and images Fleur Thorpe
Published: 08 Dec 2020

