
latest
habitat tv

Say goodbye to the morning scramble for keys, coats and sunglasses and hello to this… see this and more videos
blog

Reader roundup: See what our readers have been up to!
Refurbished vintage furniture, charming exteriors and magnet walls for kids. These projects are sure to… more
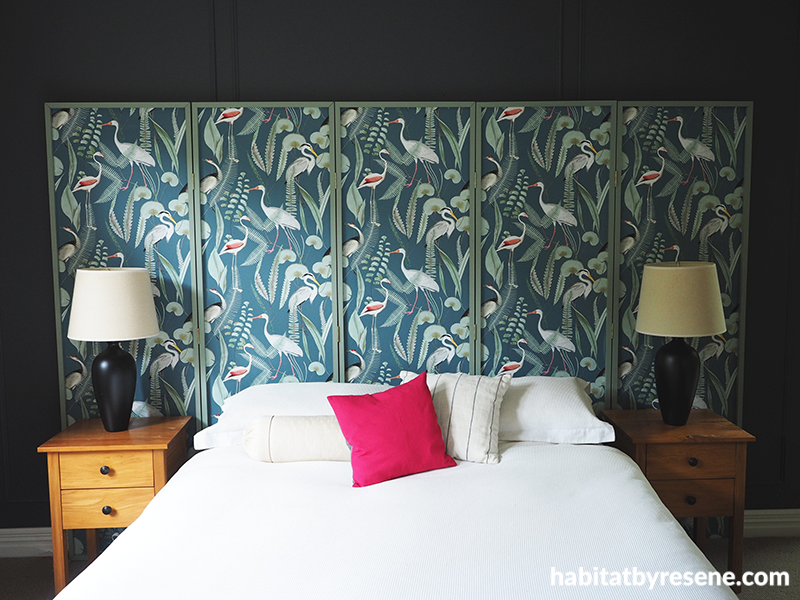
How to create a patterned DIY headboard
24 Aug 2022
There is no better way to spruce up a room than with wallpaper, but what about making it an even more striking feature? Try this patterned headboard DIY to really make a statement in your master bedroom.

This headboard makes a striking room feature finished in elegant Resene Wallpaper Collection M37414. Wall in Resene Tuna and skirting in Resene Half Rice Cake.
You will need:
- 4mm untreated plywood
- Wood for the framing (mine is 32mm x 20mm)
- Mitre saw
- Measuring tape
- Scissors
- PVA glue
- Resene Quick Dry
- Sandpaper
- Resene Lustacryl in your choice of colour (Fleur used Resene Spanish Green)
- Resene wallpaper in your choice of colour (Fleur used Resene Wallpaper Collection M37414)
- Wood glue
- Screws
- L-shaped brace corner brackets
- Hinges
How to:

Step 1: Start by working out how big you want your headboard panels to be. Fleur wanted to make hers as big as possible, as well as factoring in trying to get a rough pattern match across the panels. Her panels ended up being 1.85m tall and 53cm wide (the width of the wallpaper).
First, cut your wallpaper to length (Fleur needed five lengths). Then cut your 4mm plywood to a similar size, allowing for a bit of an overlap. Her plywood was about 13mm wider than the wallpaper on all four sides. Glue your wallpaper on to the plywood. You might find it helpful to draw a line down one edge so that you can get the wallpaper lined up straight. Your local Resene ColorShop can supply the right kind of glue for the wallpaper you choose.

Step 2: Cut all your wood frames to fit around each of your panels. Fleur cut a 15mm deep groove/slot into hers so that the plywood would slide into the grove. Make sure that the groove is slightly deeper than the margin of plywood around the wallpaper is wide.

Step 3: Use Resene Quick Dry to prime the frames. Once this is dry, give it a light sand with a fine grit sandpaper.

Step 4: Paint the frames with two coats of Resene Spanish Green, allowing for the first coat to dry before applying the second coat.

Step 5: Attach the frames to the plywood panels, securing them in place with wood glue.

Step 6: Flip the frame over and screw an “L” shaped corner bracket to each corner. Fleur also drilled a few screws in along the length of the long edges to hold the plywood in the frame.

Step 7: Add a felt pad over each of the brackets to help prevent damage to her wall when the headboard is installed.
Step 8: Fleur finished by joining each of the panels together with a 64mm brass hinge. She decided to face all the hinges in the same direction – which means it can’t fold up into a concertina – but she liked seeing the detail of the shiny hardware, and the spacing that it provided between each of the panels. Secure the headboard to the wall with screws.
project and images Fleur Thorpe
Published: 24 Aug 2022

