
latest
habitat tv

Say goodbye to the morning scramble for keys, coats and sunglasses and hello to this… see this and more videos
blog

Brick Bay unveils its poetic new folly for 2026
The winner of the 2026 Brick Bay Folly competition has been unveiled. Within the Wings… more
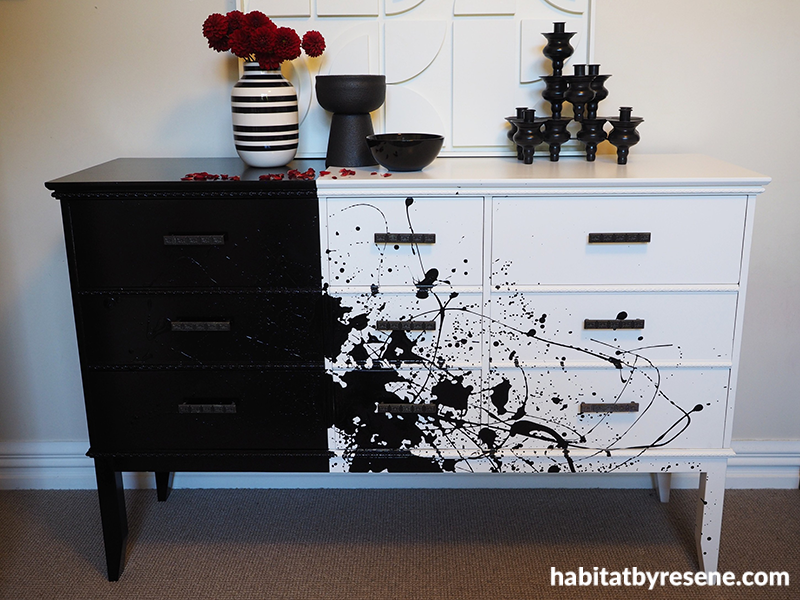
How to create your own DIY paint splat drawers
02 Jun 2022
Perhaps you’ve spied a set of wooden drawers in an op-shop ripe with potential, but you haven’t justified picking them up. Now might be your perfect chance with this fun paint splatter DIY.

The final product, striking in Resene Sea Fog and Resene Black. Wall in Resene Eighth Canterbury Clay, art in Resene Carrara and bowls in Resene Bokara Grey.
You will need:
- Chest of drawers
- Sandpaper, medium and fine grit
- Resene Quick Dry
- Small microfibre roller
- Resene paint in your choice of colours (Fleur used Resene Lustacryl in Resene Sea Fog and Resene Enamacryl in Resene Black)
- Paintbrush
- Painter masking tape
- Dropcloth
- Teaspoon
- Cloth and bowl of water
How to:

Step 1: This is a wood veneer second hand set of drawers. To start, Fleur added some legs to the base to bring the height of the drawers up to a better/more useable height.

Step 2: Take out each drawer and remove the handles. Sand the front of the drawers and the body of the drawers with a medium grit sandpaper. Wipe away the dust with a cloth and then use a small microfibre roller to apply a coat of Resene Quick Dry. Once this is dry, give it a light sand with a fine grit sandpaper.

Step 3: Use painter masking tape to tape off one-third of the drawer body. Use a small microfibre roller to paint the remaining two-thirds of the drawer body in Resene Sea Fog and do the same to the drawer fronts that fit in that side. Apply two coats, allowing for the first coat to dry before applying the second coat. Remove the tape as soon as you have finished the second coat and while the paint is still wet. Leave the paint to cure over night before starting on the last third.

Step 4: Again, use painter masking tape to tape off the remaining side and paint this in Resene Black, following the same method as above.

Step 5: Put all the drawers in and lay the furniture down on its back and use a teaspoon to throw, dribble and splat Resene Black on to it. Make sure you have a dropcloth underneath! For the big black areas, Fleur dumped a whole teaspoon full of paint down fast so it splatted out. Making the long lines of paint was less predictable, and Fleur did this by flicking the paint across the drawers. Making spots is easy – just let the paint fall from the spoon and move your arm around so that the spots fall in different places. Make sure you don’t have too much paint in your spoon while doing this.
Step 6: As soon as you have finished splatting the paint, carefully remove each drawer and wipe the paint from the edges of the drawers where it has dribbled down between the gaps. You might find a cloth and bowl of water helpful for doing this. Cleaning the paint off will help prevent the drawers from drying shut or forever sticking due to the build-up of paint. Leave the drawers to dry for several days, then reattach the handles.
project and images: Fleur Thorpe
Published: 02 Jun 2022

