
latest
habitat tv

Say goodbye to the morning scramble for keys, coats and sunglasses and hello to this… see this and more videos
blog

Brick Bay unveils its poetic new folly for 2026
The winner of the 2026 Brick Bay Folly competition has been unveiled. Within the Wings… more
Make a beautiful stacked terracotta pot vertical planter
13 Jan 2021
You will need
5 terracotta pots – 1 large, 3 medium, 1 short
1 large terracotta saucer
1.5m garden stake
Resene Aquapel & Terracotta Sealer
Resene testpot brushes
Testpot paints
Painter’s tape
Scissors
Measuring tape
Scrap piece of plywood
Electric drill
Jig saw
Hammer
Good quality potting mix
Flowering plants such as petunias, marigolds, lobelia, verbena, pansies
The sizes of the pots in this project were:
- Large – 37cm diameter, 32cm tall
- Medium – 23cm diameter, 20cm tall
- Short – 21cm diameter, 15cm tall
- Saucer – 31cm diameter

Step 1 First seal the terracotta pots with Resene Aquapel & Terracotta Sealer.

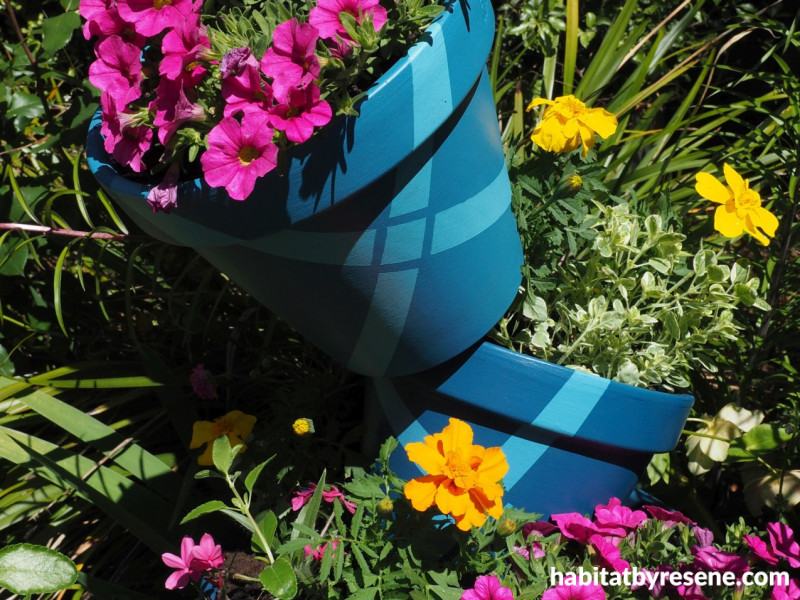
Step 2 Paint each of the pots with two coats of paint, allowing the first coat to dry before applying the second coat. Paint the largest pot in Resene Billabong, the three medium-sized pots in Resene St Kilda, Resene Blumine and Resene Calypso, and the shortest pot in Resene Hippie Blue.

Step 3 For each of the pots, use painter’s tape to mask out a diagonal cross.

Step 4 Use scissors to cut skinny bits of tape to form a square in the middle of the cross.

Step 5 With a paintbrush, use one of the lighter colours to paint on to a darker pot, or a dark colour to paint on to a lighter pot. Give each pot two coats, allowing the first coat to dry before applying the second coat.
For this project we painted:
- A Resene Blumine cross on to the Resene Billabong pot.
- A Resene Calypso cross on the Resene St Kilda pot.
- A Resene Hippie Blue cross on to the Resene Blumine pot.
- A Resene Billabong cross on to the Resene Calypso pot.
- A Resene St Kilda cross on to the Resene Hippie Blue pot.

Step 6 As soon as you have finished applying the second coat, carefully remove the painter’s tape.

Step 7 Take the short pot and measure the inner diameter with a measuring tape.

Step 8 Use the diameter measurement to cut out a circular piece of plywood using a jig saw or bandsaw. It should fit snugly inside the pot. Drill a hole in the centre of the plywood that is the same size as your garden stake. This plywood will help the pot to sit flat at the top of the stack when you assemble the planter.

Step 9 To assemble the planter in your garden, use a hammer to bang in the garden stake, thread on the largest pot and then fill the pot with good quality potting mix.

Step 10 Thread the three medium sized pots onto the stake, making sure you place them in graduating colours from darkest at the bottom to lightest at the top. Lean the pots over and fill them with potting mix.
Step 11 Plant your favourite ‘potted colour’ flowers.

Step 12 Put the shortest pot on top and insert the circular piece of plywood so that the stake comes through the hole. This will keep the pot from wobbling. If the stake is too long and the end is sticking up above the lip of the pot, bang the stake further into the ground.

Step 13 Place the terracotta saucer on top of the last pot. You can either fill the saucer with water for a bird bath or add a selection of fruit, nuts and seeds for birds to eat.
Top tip: If you are worried about the saucer blowing off, you could use some silicon glue to glue it in place.

For this project we used the beautiful blue paint shades Resene Hippie Blue, Resene Calypso, Resene Blumine, Resene St Kilda, A Resene Billabong.
project and images Fleur Thorpe’
Published: 13 Jan 2021

