
latest
habitat tv

Say goodbye to the morning scramble for keys, coats and sunglasses and hello to this… see this and more videos
blog

Re-living the 1980s through art
Clint C is an artist whose work instantly sparks recognition and joy. Based in Hamilton,… more
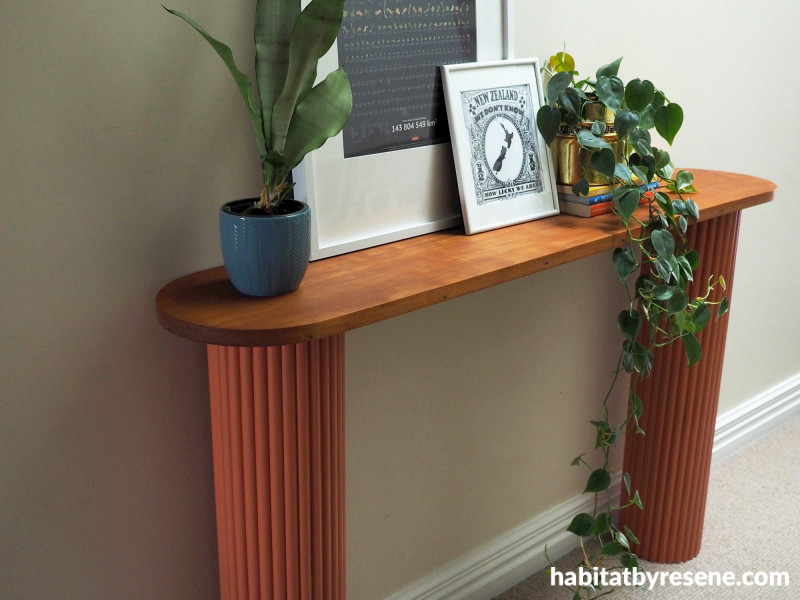
Make your own side table from a cardboard tube
19 Aug 2021
Transform a cardboard tube into a stunning side table using lengths of half round trim, glue and Resene paint. This slender table is ideal for hallways or also makes a handy bar.
You will need
21 18mm x 2.4m long pine half round trim
Scrap piece of wood for the table top – Fleur used some scrap native wood but you could buy any wood from a timber supply store. Fleur’s tabletop is 134cm long by 27.5cm wide
A large cardboard tube - Fleur’s has an outer diameter of 170mm.
Hand saw
Measuring tape
Jig saw
Pencil
Scrap MDF (thicker the better)
Wood glue
Sandpaper
Masking tape
Resene Quick Dry
Paintbrush
Resene Lustacryl tinted to your choice of colour – Fleur used Resene Apple Blossom
Electric drill and screws

Step 1 Start by measuring the height that you want the finished table to be and mark this on the tube. Remember to subtract the height of the tabletop when you make your measurements. Fleur made her table 80cm tall. Use a hand saw to cut your tube to size.

Step 2 Use scrap 18mm MDF to make the leg bases. Measure or trace the inside circumference of the tube on to the MDF and use a jig saw to cut out 12 circles.

Step 3 Glue four together with wood glue for each leg and push the circle block into the tube so that it becomes flush with the bottom of the leg. This not only gives the base of the leg a nice finish but also provides some weight at the bottom of the table.

Step 4 Next, cut the half round trim to size (80cm). As the table was 80cm in height, Fleur bought half round trim in 2.4m lengths and cut them into three to get 80cm lengths. Sand off any rough bits with sandpaper.

Step 5 Use wood glue to glue the first piece of trim to the outside length of each tube leg, use a laser level to ensure it’s straight before clamping or taping the trim in place. Take time to get this first piece as straight as possible as it will make adding the rest of the trim much easier. Leave this to dry for several hours.

Step 6 Once the first bit of trim is properly dried, start adding the rest of the trim. Run a bead of glue up the length of the trim and add it to the tube. Use a large rubber band at each end of the tube to help keep the pieces of trim in place. Alternatively use clothes pegs to hold them in place. If your last piece of trim is too wide for the remaining gap, cut and sand it down until it fits. Secure the trim in place with some tape and leave to dry overnight.

Step 7 Remove the tape and paint over the trim with Resene Quick Dry. Once dry, give it a sand with a fine grit sandpaper. This makes a huge difference in the smoothness of the final paint finish

Step 8 Dust off the sanding dust with a soft cloth and paint over the primer with two coats of Resene Apple Blossom, allowing for the first coat to dry before applying the second coat. Fleur used Resene Lustacryl semi-gloss waterborne finish, but you could use Resene Enamacryl gloss for a higher sheen or Karen Walker Chalk Colour for a matte finish.

Step 9 Next, cut your tabletop to size. Fleur used some scrap native wood but you could buy any wood from a timber supply store. Fleur’s tabletop is 134cm long by 27.5cm wide, she used a jig saw to round off the ends and Resene Danska Teak Oil to finish it.

Step 10 Take the remaining four MDF circles that you cut out earlier and glue two together. Screw these at each end to the underside of your tabletop.

Step 11 Finally, apply some glue to the sides of the MDF circles and push the legs on. If you are concerned that the glue won’t hold, you could add one or two screws to the back, screwing through the tops of the half round trim and into the MDF circles.
project and images Fleur Thorpe
Published: 19 Aug 2021

