
latest
habitat tv

Say goodbye to the morning scramble for keys, coats and sunglasses and hello to this… see this and more videos
blog

Reader roundup: See what our readers have been up to!
Refurbished vintage furniture, charming exteriors and magnet walls for kids. These projects are sure to… more
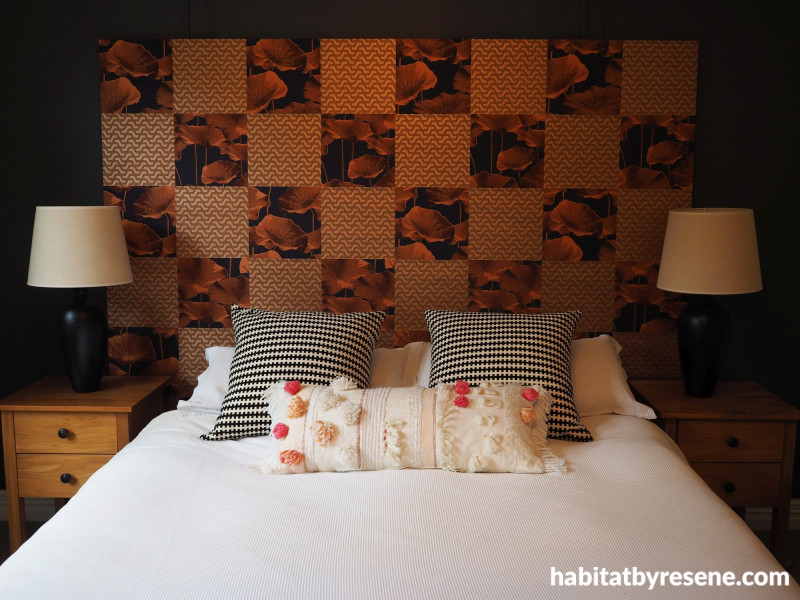
Make your own wonderful woven wallpaper headboard
11 Nov 2021
If you’re a wallpaper lover who just can’t decide on a single wallpaper, then this creative DIY is for you. This headboard will not only incorporate two of the Resene wallpapers you love, but it’ll also weave a sense of style into the room – not to mention an abundance of colour!
You will need:
- Enough plywood to make the size of headboard you want. Fleur’s is 213.9cm wide by 182.6cm tall. She used 1.5 sheets of 9mm interior grade plywood.
- 6m of 18mm x 18mm pine trim.
- 4m of 10mm x 40mm pine trim.
- Wood glue
- Screws and electric drill
- Measuring tape
- Pencil
- Ruler
- Scissors
- Staple gun
- Painters tape
- Resene Quick Dry
- Resene SpaceCote Low Sheen in your choice of colour - Fleur used Black Rock
- Paint roller and tray
- Your choice of wallpaper – Fleur used Resene Wallpaper Collection MIS405 and Resene Wallpaper Collection 2008-147-02
Before you begin: Start by working out how big you want your headboard. Fleur worked out the size of hers based on the widths of the two wallpapers that she was using and the height of the bedroom door. Don't make the headboard so big that you can't get it into your room! Fleur made hers wide enough for four drops of Resene Wallpaper Collection MIS405 hung vertically (213.9cm) and tall enough for 3.5 drops of Resene Wallpaper Collection 2008-147-02 hung horizontally (182.6cm). Fleur added on a few millimetres to each measurement to allow for a slight gap between each strip of wallpaper. She bought 2 sheets of 9mm interior plywood and had them cut into three pieces (60cm, 60cm and 62.6cm) to make up the total height of 182.6cm.

Step 1: Lay out your plywood on the floor and use wood glue to attach a frame around the outside using 18mm x 18mm timber. Fleur used a screw to secure each corner. Next, use the same type of wood to make two vertical braces, again using a screw to secure each join. Measure and cut some 10mm x 40mm wood and glue this to the joins in the plywood so that they would sit rigid and flat. Place weights on the wood while it dries. You can also use some brad nails or small finishing nails for extra strength.

Step 2: Flip the headboard over and use a roller to paint on Resene Quick Dry primer, followed by two coats of Resene SpaceCote Low Sheen in Resene Black Rock, allowing each coat to dry before adding the next. This step is important for disguising any gaps in your weaving later.

Step 3: Cut your wallpaper into lengths, allowing for a bit extra to wrap around the back of the headboard at both ends. Next, use a pencil and ruler and measure the middle width of the wallpapers and draw a pencil line on the back of the paper. Use scissors to cut the wallpaper into two long strips.
To attach the wallpaper, use a staple gun and staple the paper to the top edge of the frame. Fleur left one millimetre between each strip to allow for the horizontal paper to fit between. You might find it helpful to make measurement marks with your pencil at the bottom of the headboard so that you can ensure the paper is hanging straight. A bit of painters tape is also helpful in temporally keeping the wallpaper vertical.

Step 4: Next, take the first piece of your next choice of wallpaper – Fleur used Resene Wallpaper Collection 2008-147-02 – and weave this in and out of the floral paper. When you’re happy with its position, put some glue underneath the paper to glue it to the ply and smooth it flat with your hand.

Step 5: Proceed with the next piece of geometric paper, making sure that the weave pattern is correct and glue it down when you are happy with its position. Keep checking that the vertical paper is staying vertical and that nothing is creeping out of line.
Proceed with weaving the rest of the paper and gluing as you go.
When you're finished gluing the paper in place, flip the headboard over and staple the ends to the back of the frame.

Step 6: Secure your headboard to the wall with a couple of long screws, ideally screwing into wall studs. Use a dab of your chosen Resene colour – Fleur used Resene Black Rock – to help hide the screws.
Tip: Make sure that the pattern on the wallpaper you use horizontally will look good on its side. Geometric patterns should work fine, whereas florals with leaves and flowers growing upwards may not look as good.
project and images Fleur Thorpe
Published: 11 Nov 2021

