
latest
habitat tv

Say goodbye to the morning scramble for keys, coats and sunglasses and hello to this… see this and more videos
blog

Brick Bay unveils its poetic new folly for 2026
The winner of the 2026 Brick Bay Folly competition has been unveiled. Within the Wings… more
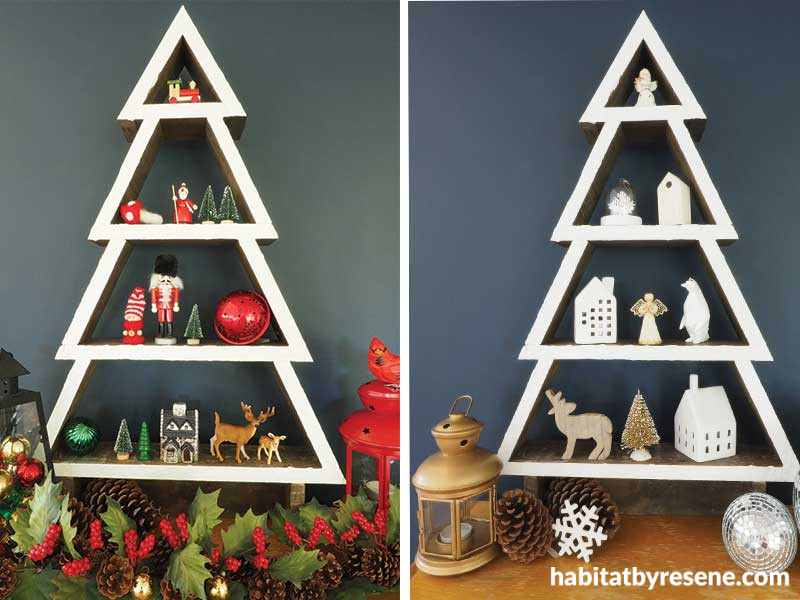
Take the ultimate festive ‘shelfie’ with this Christmas tree shelf
24 Nov 2021
Get your home ‘shelfie’ ready this Christmas with this standing Christmas tree shelf built from old pallets. Fill the shelves with your favourite Christmas cards or paint ornaments in your favourite Resene testpots to match your Christmas theme.
You will need
- Lengths of pallet wood (approx. 3.3m)
- Measuring tape
- Mitre saw
- Sandpaper
- Resene Colorwood Touchwood
- Cloth/rag
- Wood glue
- Brad nail gun
- Paintbrush
- Resene Quick Dry
- Resene Sandtex Mediterranean Effect tinted to Resene Rice Cake
- Your favourite Resene testpot colours for painting shelf ornaments

Step 1: For this project Fleur used wood from an old pallet but it could easily be made out of new store-bought pine. Fleur’s pallet wood was 9.5cm wide and 2cm thick. First cut the three shelves by setting your mitre saw to cut at 25 degrees and make the bottom shelf a length of 48cm, with the two cut ends angled in. Cut the middle shelf to a length of 38cm from longest point to longest point and cut the top shelf to 28cm from longest point to longest point.

Step 2: Next, cut six lengths for the sides of the Christmas tree. Fleur’s were 17cm long but you could make yours bigger or smaller depending on how big you want your finished shelf to be. The two cut ends should be parallel and cut at 25 degrees.

Step 3: Sand the flat faces of the boards to remove any rough patches and give the front edge a really good sand, so that the primer and paint will adhere well.

Step 4: Stain the wood with Resene Colorwood Touchwood, using a cloth to rub in the stain. For a darker finish, apply two coats.

Step 5: Use wood glue to start gluing your shelf together. Alternatively, use a nail gun.

Step 6: While the glue is drying, cut the wood for the top triangle of the tree. Set your mitre saw to a 30 degree angle and cut three lengths at 14cm, 16.5cm and 19cm (from longest point to longest point) so that the angles of the cut ends are facing inwards. Sand the faces of the boards and the front edge and stain the faces with Resene Colorwood Touchwood and glue together on to the top of the shelf.

Step 7: Use a paintbrush to paint on one coat of Resene Quick Dry to the front edge of the wood.

Step 8: Once the primer has dried, apply a coat of Resene Sandtex Mediterranean Effect in your choice of colour – Fleur used Resene Rice Cake and dabbed it on liberally to create a rough ‘snowy’ texture. Set aside and allow to dry for a couple of hours.

Step 9: For the base, cut one length of wood 32cm long and two lengths at 9.5cm long (or to the width of your wood). Glue and nail this to the bottom of your shelf.

Touch up any of the exposed cut ends with more Resene Colorwood Touchwood and decorate with ornaments painted in your favourite Resene testpots, Fleur used Resene Fuel Yellow, Resene Colour Me Pink, Resene Hopskotch, Resene Ecstasy, Resene Pelorous and Resene Highland. Wall painted in Resene Dark Knight.

For an alternative Scandi tree, paint the ornaments in Resene Cararra. Background wall in Resene Dark Knight.
project and image Fleur Thorpe
Published: 24 Nov 2021

