
latest
habitat tv

Say goodbye to the morning scramble for keys, coats and sunglasses and hello to this… see this and more videos
blog

Reader roundup: See what our readers have been up to!
Refurbished vintage furniture, charming exteriors and magnet walls for kids. These projects are sure to… more
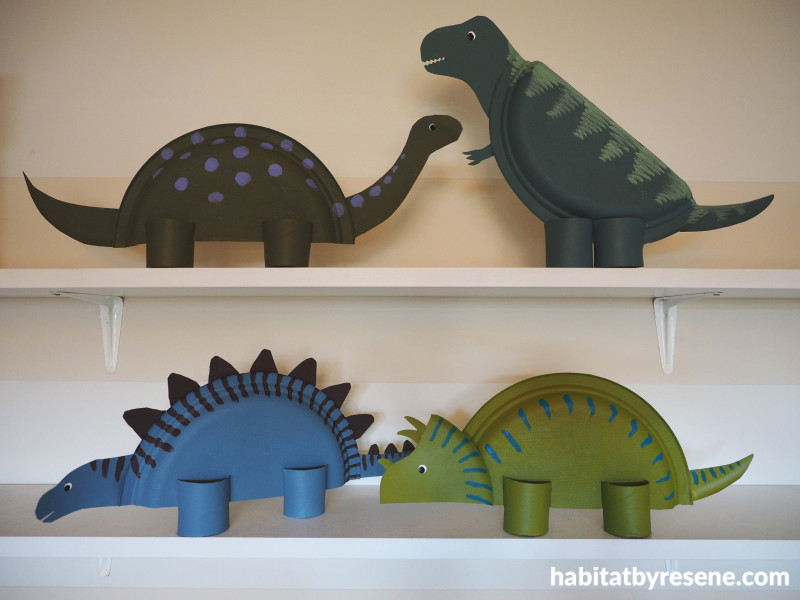
These paper plate dinosaurs are sure to be a roaring success
22 Jul 2021
These DIY paper plate dinosaurs are a roar-some idea for dino lovers and budding palaeontologists . Enter a land before time – and screens – these school holidays and get crafty with your favourite Resene paint colours. These dino-mite DIYs will add a pop of colour to your kid’s room and can also double as a creative toy. Don’t wait for the holidays to be extinct, get painting!
You will need:
- 3 paper plates (26cm diameter)
- Scissors
- Hot glue gun
- Your choice of Resene testpots – Fleur used Resene Grass Hopper and Resene Blue Lagoon for the Triceratops, Resene Seachange and Resene Rebel for the Stegosaurus, Resene Green Meets Blue and Resene Amulet for the T-Rex, Resene Waiouru and Resene Reverie for the Diplodocus, and Resene White and Resene Black for the eyes.
- Craft brushes in a variety of sizes
- 4 toilet rolls

Step 1: Use scissors to cut two of the paper plates in half.

Step 2: Use the third plate to cut out shapes for the dinosaur’s head and tail. If you don’t have a third plate you can use scrap cardboard, such as an old cereal box.

Step 3: Attach the head and tail to the body with a hot glue gun and paint the dinosaur.

Step 4: Paint the dinosaur’s eyes – Fleur used Resene White and Resene Black. Fleur used the end of her paint brush for making small spots like eyes.

Step 5: Cut four toilet rolls in half. Cut two slits halfway down on opposite sides of each piece.

Step 6: Paint the toilet rolls with your choice of Resene testpots. Once dry, push the dinosaur bodies into the slits of the toilet roll legs. You can secure them with hot glue if need be.
project and images Fleur Thorpe
Published: 22 Jul 2021

