
latest
habitat tv

Say goodbye to the morning scramble for keys, coats and sunglasses and hello to this… see this and more videos
blog

Re-living the 1980s through art
Clint C is an artist whose work instantly sparks recognition and joy. Based in Hamilton,… more
Three Christmas decoration ideas with easy step-by-step instructions
07 Dec 2021
Get ready to deck your hall, wall or Christmas table with these simple DIY projects. These fun projects use a simple palette of a few Resene colours to create Christmas cheer and are great projects to get the family involved in.

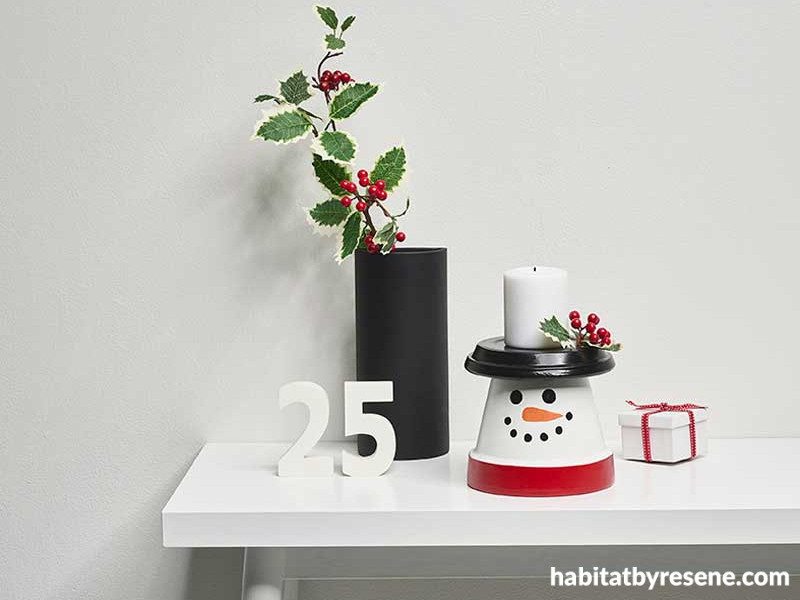
Project 1: Turn a pot into a snowman candle holder
You will need
Terracotta pot size 15
Terracotta pot lid size 17
Resene testpots in your choice of colours, Vanessa used Resene White, Resene Black, Resene Red Berry and Resene Ayers Rock
Testpot brushes
Foam brush (we used the foam end for the eyes and the wooden end for the mouth)
Candle
Decorative holly
Craft glue

Step 1: Paint the lid of the pot in Resene Black.

Step 2: Paint the lower part of the pot in Resene White.

Step 3: Use painter’s masking tape to tape and paint the lip of the pot in Resene Red Berry.

Step 4: Once the paint has dried on the pot and lid, pencil where you want to paint the eyes, nose and mouth and then paint the nose onto the pot with Resene Ayers Rock.

Step 5: Using a small foam brush as a stamp, paint the eyes with Resene Black.

Step 6: Using the wooden end of the foam brush as a stamp, paint the mouth in Resene Black.

Step 7: Once the paint is dry, glue the pot lid to the bottom of the pot to form a hat for the snowman.

Step 8: Glue a piece of faux holly to the lid and add your candle.

Step 9: Place on your dining table or entrance table for some festive cheer. Wall Resene Black White, table and numbers in Resene White and vase in Resene Black. Decorative holly branch from Kmart.
project Vanessa Nouwens
images Bryce Carleton.
---
Project 2: Make a snowman artwork

Let it snow, let it snow, let it snow! This snowman artwork is painted in Resene White, Resene Black and Resene Ayers Rock this Christmas. Wall in Resene Black White and chair in Resene Black. Other items stylist’s own.
You will need:
Art canvas (Vanesa’s was 50 x 60cm)
Resene testpots in your choice of colours, Vanessa used Resene White, Resene Black and Resene Ayers Rock
Testpot brush
Artist’s paintbrush for details
Pencil (for drawing face before painting)
Step 1: Paint your canvas using Resene White.
Step 2: Using your pencil, draw the triangle nose and round eyes with a pencil.
Step 3: Paint the eyes and nose onto canvas using Resene Black for the eyes and Resene Ayers Rock for the nose. To create a perfect straight line for the nose, mask up the shape with painter’s tape.
Step 4: Hang on your wall and enjoy the festive season!
project Vanessa Nouwens
image Bryce Carleton
---
Project 3: Santa gift pot or flower pot

This Santa pot is great as a decoration or as a container for home-baked sweet treats. Pot decorated in Resene Red Berry and Resene White and background wall in Resene Black White.
You will need:
Terracotta pot, size 15
Black buttons
Glue
Testpots in your choice of colours, Vanessa used Resene Red Berry and Resene White
Testpot brush
Painter’s tape

Step 1: Paint the rim of your pot in Resene White or use painter’s tape to mask to create a perfect straight edge.

Step 2: Take your terracotta pot and paint the lower part of the pot in two coats Resene Red Berry.

Step 3: Once dry, remove making tape and glue on black buttons. If you can’t find black buttons, paint over other old buttons with a Resene Black testpot.

Step 4: Either pop in a plant (real or faux) or add some cookies or sweet treats and gift to friends and family. This festive Santa pot is painted in Resene Red Berry, Resene White. Table in Resene Red Berry and wall in Resene Black White. Faux Poinsettia from Kmart, other items stylist’s own.
Top tip: If you’re planning to plant a real plant, paint your terracotta pot inside and out with Resene Aquapel & Terracotta Sealer before painting on the first coat of paint. This will help prevent the water bubbling over your paint.
Published: 07 Dec 2021

