
latest
habitat tv

Say goodbye to the morning scramble for keys, coats and sunglasses and hello to this… see this and more videos
blog

Re-living the 1980s through art
Clint C is an artist whose work instantly sparks recognition and joy. Based in Hamilton,… more
Two spook-tacular ghost DIYs
27 Oct 2021
If your Halloween plans are looking a little grave, why not trick or treat yourself with these fun, creative and functional ghost DIYs? All you need is a few pieces of wood, a splash of Resene paint and a touch of imagination, so if you’ve got it, haunt it. With simple step by step instructions, we’re here to raise your spirits and get you inspired this Halloween.
Ghostly coasters

These ghostly coasters are sure to be a hit and are painted in Resene Black and Resene White. The table is in Resene Ecstasy and the wall is in Resene Black White. Project by Vanessa Nouwens. Image by Bryce Carleton.
Ghouls just want to have fun – but not at your table’s expense! While a Halloween gathering can be a riot of excitement and joy, the ghostly marks of forgotten cups on your furniture is not. These ghost coasters strike the perfect balance between fun and functional. Here’s how you can create your own:
You will need:
- MDF coasters (Vanessa’s were from Kmart)
- Resene testpots in your choice of colours (Vanessa’s were Resene Black and Resene White)
- Testpot brush
- Craft brush
- Vinyl sticker
- Scissors
- Pencil
- Ghost shape cut out of paper
- Resene FX Nightlight glow-in-the-dark (optional)

Step 1: Paint your coasters in two coats of the colour you want the ghost to be – Vanessa used Resene White.
Top tip: For extra fun at night, paint Resene FX Nightlight on after Resene White for a glow-in-the-dark effect.

Step 2: Print out or draw a ghost shape to use as a stencil.

Step 3: Draw the ghost shape onto a piece of sticker vinyl.

Step 4: Cut out vinyl ghost shapes and stick them onto the painted coasters. Make sure you press firmly around the edges so that the paint does not seep.

Step 5: Paint your coasters in your chosen background colour – Vanessa used Resene Black – painting over the vinyl. Use two coats of paint per coaster.

Step 6: Once dry, peel the vinyl off the coaster to reveal the coloured ghost shape.

Step 7: Draw the ghost faces onto the coasters in pencil.

Step 8: Paint the ghost faces onto the coasters using a fine brush and your choice of Resene colour.
Step 9: Your coasters are now ready to use – Happy Halloween!
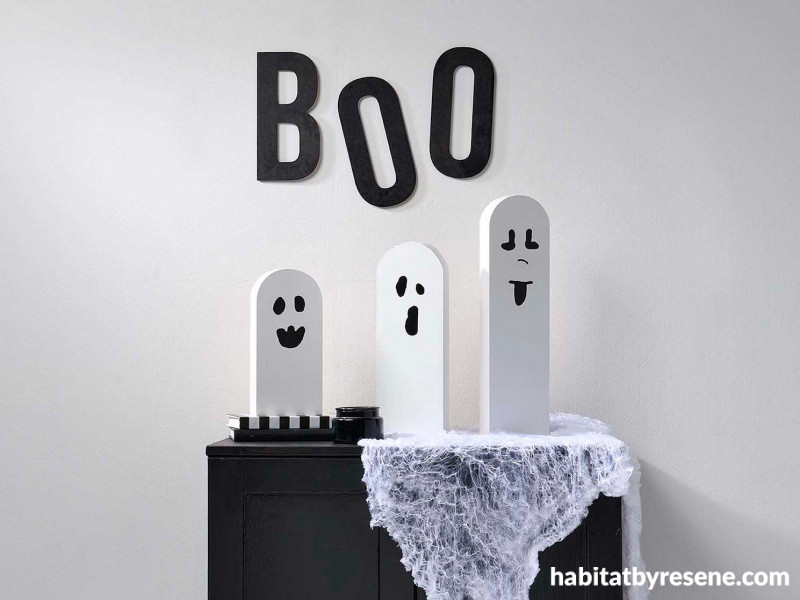
It’s a ghost town
These friendly ghosts are painted in bright Resene White with Resene Black details. The wall is in Resene Black White with lettering and cabinet in Resene Black. Project by Vanessa Nouwens. Image by Bryce Carleton.
These frightfully friendly ghosts are sure to up the spook-factor in your home!
You will need:
- 1 piece of wood – Vanessa’s was 50cm in length, 4cm thick and 14cm wide
- Resene paint in your choice of colours – Vanessa used Resene Black and Resene White
- Testpot brush
- Craft brush
- Pencil
- Jigsaw
- Bowl
- Resene FX Nightlight glow-in-the-dark (optional)

Step 1: To get the curve end of the ghost’s head, use a bowl and trace the outside curve in pencil onto the wood. Repeat for all three ghosts.

Step 2: Using a jigsaw, cut around the curved ends.

Step3: Give the curved ends of your wood a light sand.

Step 4: Paint the three wooden ghosts in your choice of Resene colour – Vanessa used Resene White. Paint two coats for best coverage.
Top tip: For extra fun at night, paint Resene FX Nightlight on after Resene White for a glow-in-the-dark effect.

Step 5: Using a pencil, draw ghostly faces onto the wood.

Step 6: Using a thin paintbrush, paint the ghost faces in a dark colour such as Resene Black.
Step 7: Display in your entranceway, for a spook-tacular entry.
Published: 27 Oct 2021

