
latest
habitat tv

Say goodbye to the morning scramble for keys, coats and sunglasses and hello to this… see this and more videos
blog

Reader roundup: See what our readers have been up to!
Refurbished vintage furniture, charming exteriors and magnet walls for kids. These projects are sure to… more
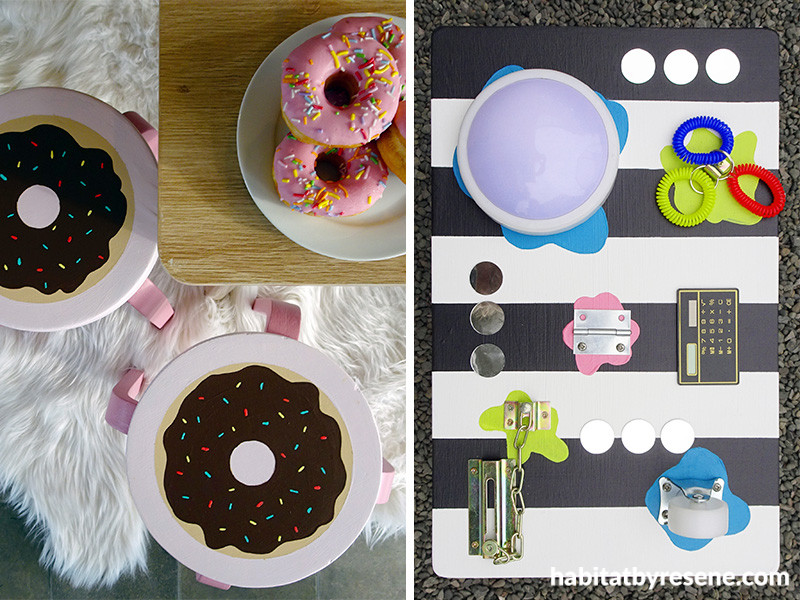
Upcycle DIY: sweet stools and a touchy table
18 Oct 2018
Take an old children’s table and turn it into a fun and tactile sensory board. Then team it with some stools painted to look like donuts!
Sarah Herring shows us how.
For the table, you will need:
- Testpot and artist’s brushes
- Sandpaper
- Resene Quick Dry primer sealer undercoat
- Ruler and pencil
- Painter’s masking tape
- Assorted hardware and sensory objects (dollar stores are a great start)
- Super strong glue and a drill with small screws
- Resene testpots in your choice of colours. We used Resene Black White, Resene All Black, Resene Hopbush and Resene She'll Be Right.

Step 1: Repair and clean the table. Lightly sand the the table top and apply a coat of Resene Quick Dry primer sealer undercoat. If the surface is very smooth, use Resene Waterborne Smooth Surface Sealer instead of primer. Paint the table legs too, if necessary.
Step 2: Apply two coats of Resene Black White over the table top, waiting for each coat to dry completely in between. Once completely dried, measure and mask out a simple striped pattern.

Step 3: Apply two coats of Resene All Black to every other striped area, waiting for each coat to dry completely. Once dry, remove the masking tape carefully and touch up with a detail brush if needed.
Step 4: Paint splat shapes under where some of the objects will be fixed using an artist’s brush. We used Resene Hopbush, Resene ASAP and Resene She’ll Be Right.

Step 5: Use a mix of objects such as push-button lights, sliding locks with chains, stretchy plastic bands, stick on mirror shapes, a solar calculator and a castor wheel. Make sure all the items you select can be securely fastened to the table and are SAFE for a child to play with. Map out with a pencil where each item will go, then fix them to the table with a drill and screws, or with extra strong glue.
Top tip: Sensory boards can be made with all sorts of textures and themes for young children, and are great learning tools. We always recommend that they are only used with careful adult supervision.
For the stools, you will need:
- Testpot and artist’s brushes
- Sandpaper
- Painter’s masking tape and scissors
- Resene Quick Dry primer sealer undercoat
- Resene testpots of your choice. We used some sweet-sounding paints like Resene Turkish Delight, Resene Vanilla Ice, Resene Calico, Resene Milk Chocolate, Resene Freelance, Resene Rapture and Resene Witch Haze (for the ‘sprinkles’)

Step 1: Check and repairs the stools if necessary. Sand the stools.
Step 2: Apply one coat of Resene Quick Dry primer sealer undercoat to all surfaces.

Step 3: Apply two coats of your chosen base colour – we used Resene Turkish Delight – allowing the paint to dry thoroughly in between coats. Once the base colour is dry, apply two coats of your second colour to the seats of the stools. We used Resene Vanilla Ice.
Step 4: Using circle stencils or a compass draw a donut shape on top of each stool with a pencil. Mask around the edges using masking tape so you have two donut shapes ready to paint. Paint the two donuts with two coats of Resene Calico.
Top tip: To mask circular shapes, make small scissor cuts along the masking tape to be able to curve the tape around the circular edge. Make sure you cover all the open gaps with extra tape so paint doesn’t sneak in.

Step 5: Apply two coats of Resene Milk Chocolate in an icing shape on top of each donut using an artist’s brush to create the wobbly outline. Once dry, carefully remove the masking tape. Paint brightly coloured ‘sprinkles’ using Resene Freelance, Resene Rapture and Resene Witch Haze.
Top tip: For a glitter donut effect use touches of Resene FX Metallic in your favourite Resene metallic colour.
Projects by Sarah Herring.
These DIYs are brought to you by Upcycling for Good, a collaboration between Resene and The Salvation Army family stores. The project asks keen DIYers to upcycle second-hand items using Resene paint – look out for this regular feature on Habitat by Resene.
Published: 18 Oct 2018

