
latest
habitat tv

Say goodbye to the morning scramble for keys, coats and sunglasses and hello to this… see this and more videos
blog

Brick Bay unveils its poetic new folly for 2026
The winner of the 2026 Brick Bay Folly competition has been unveiled. Within the Wings… more
How to create a DIY stencilled bench seat for your garden
11 Aug 2022
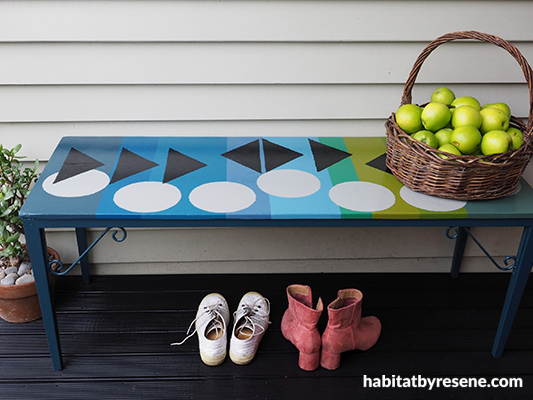
Need a new addition to add some colour to your garden in winter or have an old garden seat that needs a little touch up? Why not brighten it with shades like Resene St Kilda and Resene Green Pea. When spring arrives it’ll be a perfect spot to perch with a cup of tea in the garden. Alternatively, you could use it as a bright spot to sit while you put on your shoes at the front door.

The colourful finished DIY stencilled bench seat painted in Resene Warrior,Resene St Kilda,Resene Teal Blue, Resene Liberty, Resene Bismark,Resene Green Pea, Resene Planter,Resene Untamed,Resene Middle Earth,Resene Castle Rock and Resene Black. Weatherboards in Resene Triple Ash.
You will need:
- Sandpaper
- Wooden bench seat
- Rag/cloth
- Resene Quick Dry
- Measuring tape
- Resene paint in your choice of colours (Fleur used Resene Lustacryl tinted to Resene Warrior, Resene St Kilda, Resene Teal Blue, Resene Liberty, Resene Bismarck, Resene Green Pea, Resene Planter, Resene Untamed, Resene Middle Earth, Resene Castle Rock and Resene Black). For small quantities of lots of colours, you can use Resene testpots.
- Paintbrush
- Painters tape
- Cardboard for making stencil
- Craft knife
- Small piece of foam or sponge
How to:

Step 1: Start by giving the bench seat a good sand with a medium grit sandpaper. Wipe away the dust with a soft dry cloth. Paint the seat with one coat of Resene Quick Dry. Once the primer is dry, give it a light sand with a fine grit sandpaper.

Step 2: Paint the legs and base of the seat with two coats of Resene Warrior, allowing for the first coat to dry before applying the second coat. Use a measuring tape to mark stripes along the top of the seat. Use painters tape to tape off every second stripe and paint each stripe a different colour. Fleur used Resene Warrior, Resene Teal Blue, Resene Bismark, Resene Planter and Resene Middle Earth.

Step 3: Remove the tape as soon as you have finished the second coat.

Step 4: Once the paint has cured overnight, use tape again to paint in the remaining stripes with Resene St Kilda, Resene Liberty, Resene Green Pea and Resene Untamed.
Step 5: Cut out a stencil of a circle and a triangle. Fleur’s circle is 13cm in diameter and the base of the triangle is 22cm long. With a small piece of foam, dab paint into the stencil. Fleur used Resene Castle Rock for the circles and Resene Black for the triangles.
project and images Fleur Thorpe
Published: 11 Aug 2022

