
latest
habitat tv

Say goodbye to the morning scramble for keys, coats and sunglasses and hello to this… see this and more videos
blog

Re-living the 1980s through art
Clint C is an artist whose work instantly sparks recognition and joy. Based in Hamilton,… more
Three DIY Easter projects for a festive dining table
07 Apr 2022
Hop into these DIY Easter projects this weekend, they could be eggs-actly what you need to add a bit of festive flair to your table.
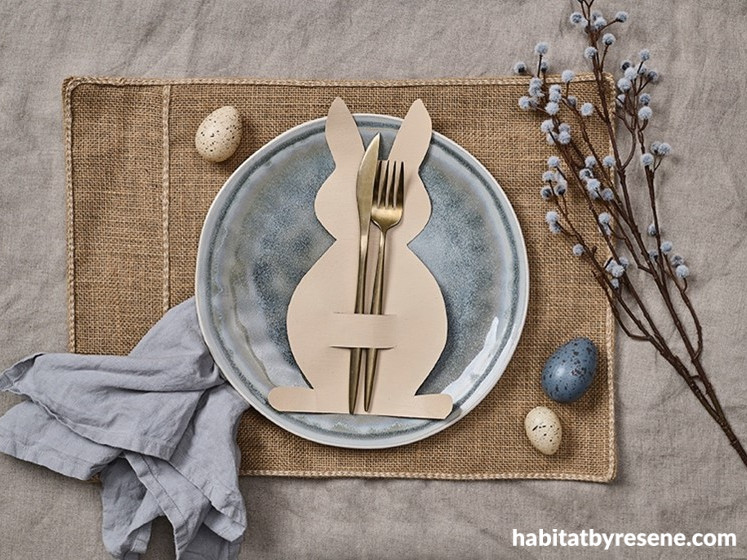
How to make a bunny cutlery holder
You will need:
- Piece of A4 cardboard
- Scissors
- Resene testpot in your choice of colour, Vanessa used Resene Sand
- Resene testpot brush
- Bunny template or stencil
- Pencil
Step 1: Paint your piece of cardboard in your desired colour. Vanessa used Resene Sand.
Step 2: Draw your own bunny template, print a bunny template off the internet at A4 size or use a bunny stencil.
Step 3: Draw around your bunny shape with a pencil onto cardboard.
Step 4: Cut the bunny shape out with scissors.
Step 5: Cut two slits in the cardboard down the lower part of the bunny.
Step 6: Slide your cutlery in and place on your table setting.
Top tip: You can also use this bunny as a holder for small Easter goodies by replacing the cutlery with a sweet treat.

Bunny cutlery holder painted with Resene Sand. Linen tablecloth from H&M, burlap placemat, plate and willow branch from Freedom.
project Vanessa Nouwens
image Bryce Carleton
------
How to make bunny coasters

Coasters painted with Resene Paper Doll and Resene Tea. Linen tablecloth from H&M, pink napkin from Kmart.
You will need:
- Mdf coaster(s)
- Sticker adhesive
- Scissors
- Pencil
- Resene testpot paintbrush
- Small bunny template
- Resene testpots in your choice of Resene colours; Vanessa used Resene Paper Doll and Resene Tea
Step 1: Paint your mdf coaster in your desired colour, Vanessa used Resene Paper Doll.
Step 2: Trace around your bunny template onto the sticker adhesive in pencil. (Vanessa created her own bunny outline, but if you’re not confident you could find a bunny image online and trace around it, or use a bunny cookie cutter).
Step 3: Cut your bunny shape out.
Step 4: Stick your sticker bunny shape onto the painted coaster and smooth all edges so there is no leakage of paint.
Step 5: Paint the whole coaster including the sticker part. You will need two coats of paint. Vanessa used Resene Tea.
Step 6: Once touch dry, peel off the sticker shape to reveal the painted bunny shape underneath.
project Vanessa Nouwens
image Bryce Carleton
-----
How to make your own ice block stick treat basket
 Treat basket painted with Resene Moonbeam, Resene Paris Daisy and Resene Villa White. The background wall is Resene Merino.
You will need:
- Small round cardboard box (or you could use a square one)
- 17 large ice block sticks
- Resene testpots in your choice of colours, Vanessa used Resene Moonbeam, Resene Paris Daisy and Resene Villa White
- Resene testpot brush
- Scissors
- Pencil
- Ruler
- Pipe cleaner
- Glue
- Faux daisy (optional)
Step 1: Paint the round cardboard box both in and outside. Vanessa painted hers in Resene Moonbeam.
Step 2: Measure your ice block stick and make a pencil mark at 12cm in length.
Step 3: Cut the end off of the ice block stick with scissors.
Step 4: Paint your ice block sticks in Resene testpot colours: Resene Moonbeam, Resene Paris Daisy and Resene Villa White on both sides.
Step 5: Glue your ice block sticks to the round cardboard box alternating the colours.
Step 6: Glue the pipe cleaner ends to the inside of the cardboard box to make the handle.
Step 7: Add in paper straw and your chocolate treats.
Step 8: (Optional) If you want to add a small faux or real flower purely for decoration, you can.
project Vanessa Nouwens
image Bryce Carleton
Published: 07 Apr 2022

