
latest
habitat tv

Say goodbye to the morning scramble for keys, coats and sunglasses and hello to this… see this and more videos
blog

Re-living the 1980s through art
Clint C is an artist whose work instantly sparks recognition and joy. Based in Hamilton,… more
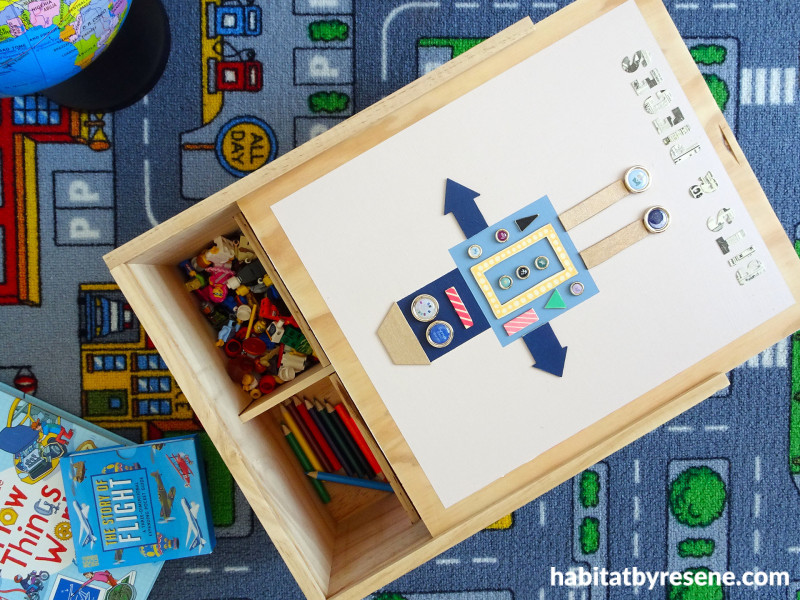
Bring this clever DIY toy box idea home
08 Jun 2020
Turn an ordinary wooden gift box into a treasure chest for your kids’ toys and knick-knacks. Get them to help with the design and execution for a fun rainy day activity.
You will need:
- Painter’s masking tape
- Pencil, eraser, ruler and scissors
- Clear drying and strong hold glue
- Testpot paintbrush
- Resene Quick Dry waterborne primer undercoat
- Resene testpots in your choice of colours – Sarah used Resene Bunting, Resene Wafer, Resene Escapade and Resene Goldmine
- Assorted buttons, balsawood shapes, stick-on letters and other embellishments

Step 1 Remove old stains and marks with sandpaper, wipe down with a damp cloth, then apply Resene Quick Dry waterborne primer and allow to dry. If, like our box, yours has a sliding lid, be sure not to put too much primer around the track – it will make sliding on the lid very difficult.
Step 2 Apply two coats of your chosen colour to the lid of your box with a testpot brush and allow to dry. Use a hairdryer to help accelerate the drying of the paint. Sarah chose Resene Wafer for her basecoat.

Step 3 Once the lid is dry, measure and mask out square shapes to make a robot design on the lid and paint them using your chosen Resene testpot colours. Sarah used Resene Bunting for the head of the robot and Resene Escapade for the body. She painted a few pieces of balsawood in Resene Goldmine for the legs and hat and then glued these onto the lid once the body and head of the robot was dry. Give your robot a bit of flair by adding some buttons and treasures to its design.

Step 4 Use adhesive lettering to label the lid of the box with the words ‘Bits & Pieces’, or paint your own letters using a Resene testpot.


Step 5 Set aside the lid. Mask out three stripes around the outside of the box using painter’s masking tape. Paint the stripes, allow to dry and then carefully remove the masking tape. Sarah used Resene Bunting, Resene Wafer and Resene Escapade.

Step 6 Adorn the outside of the box with more adhesive words once the stripes have dried. Sarah spelled out ‘Lego‘, ‘Toys‘, ‘Treasure‘ and ‘Fun‘. Fill the finished box with trinkets and treasures and all the things kids like to collect.
Top tip: If your box is old or a colour you don’t like, repaint the whole box using your chosen Resene colour, before applying your stripes and robot using a Resene testpot. If your child is keen on trains, cars, space or something else, consider incorporating one of their favourite themes onto the lid in place of the robot.

Resene Wafer has been used on the lid of this box to provide a neutral surface for the robot design to stand-out. The colours of the robot, Resene Bunting and Resene Wafer, have been echoed in the stripes along the sides of the box. Resene Goldmine adds a metallic shine.
project and images Sarah Herring
Published: 08 Jun 2020

